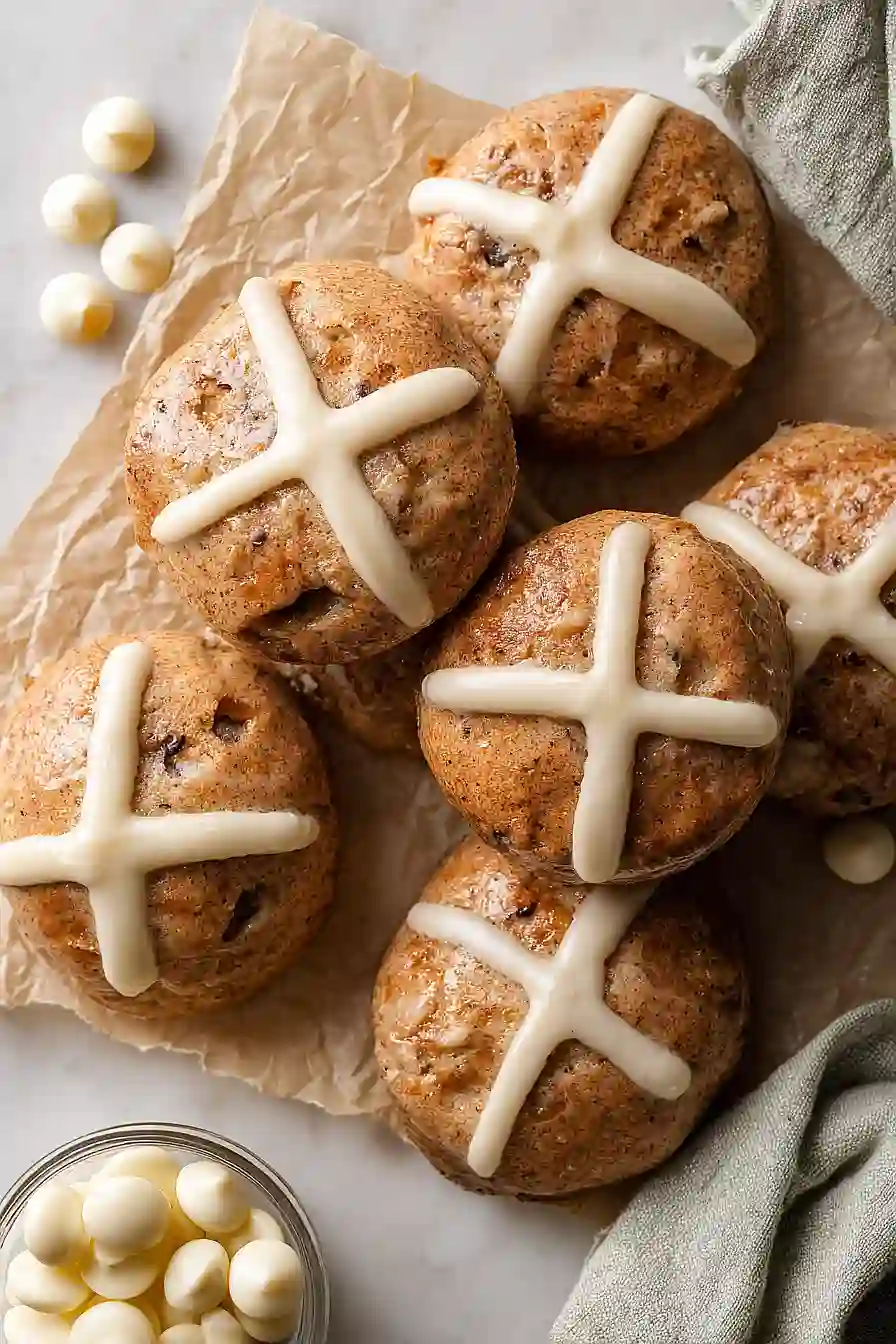
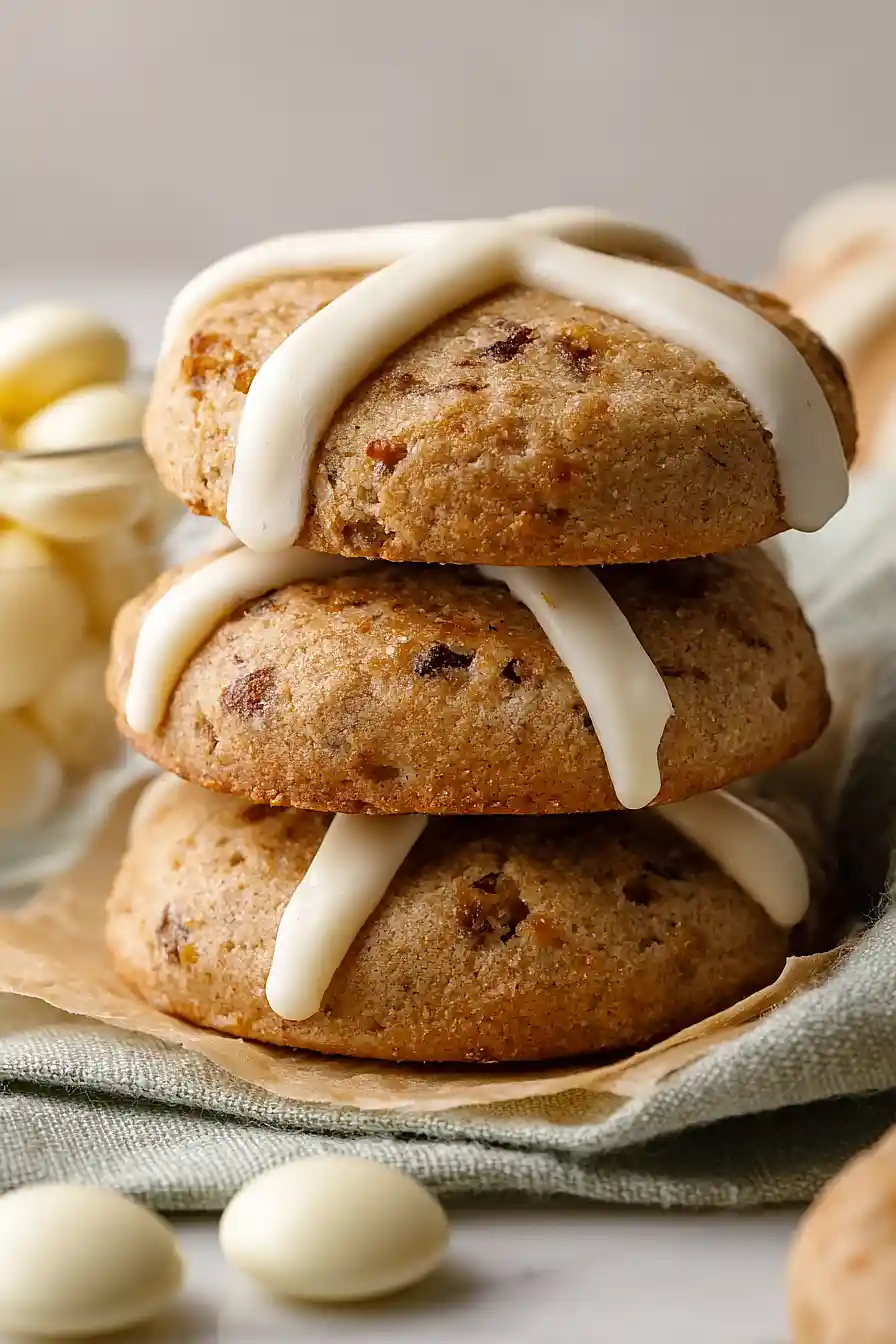
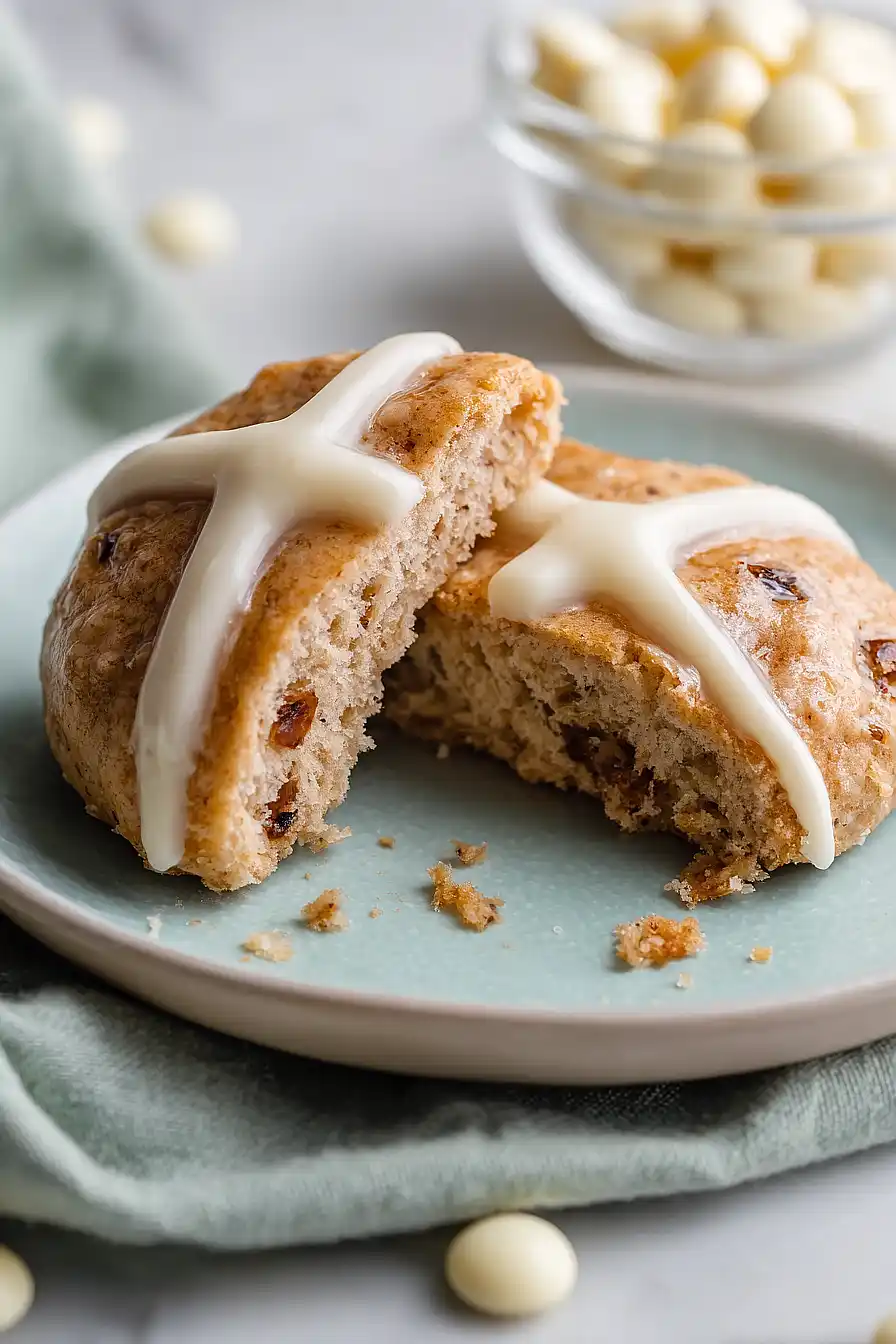
Here are my hot cross bun cookies, with a buttery shortbread base loaded with raisins and mixed peel, warm mixed spice, and a sweet white chocolate cross on top.
These cookies are perfect when you’re craving those classic Easter flavors but want something quicker than making actual hot cross buns. I love baking a batch to enjoy with my morning coffee during the spring season.
Why You’ll Love These Hot Cross Bun Cookies
- Quick and easy – These cookies come together in about an hour, which is way faster than making traditional hot cross buns from scratch with all that rising time.
- Simple ingredients – You probably have most of these pantry staples on hand already, and the specialty items like mixed peel and spice are easy to find during the Easter season.
- Fun twist on a classic – All the flavors you love from hot cross buns—the warm spices, sweet fruit, and iconic white cross—but in a crispy, buttery cookie form that’s perfect for snacking.
- Great for sharing – These cookies are ideal for Easter gatherings, bake sales, or gift-giving since they’re easier to transport and serve than traditional buns.
What Kind of Flour Should I Use?
All-purpose flour is your best bet for these hot cross bun cookies, giving you that perfect balance between a tender cookie and enough structure to hold all those tasty mix-ins. You can use bleached or unbleached all-purpose flour – either one will work just fine and you probably won’t notice much difference in the final cookie. If you only have self-rising flour on hand, you’ll want to skip it for this recipe since we’re not using any additional leavening agents, and the extra baking powder in self-rising flour could throw off the texture. For the best results, spoon your flour into your measuring cup and level it off with a knife rather than scooping directly from the bag, which can pack in too much flour and make your cookies dry.
Options for Substitutions
These cookies are pretty forgiving when it comes to swaps, so here are some options if you need them:
- Mixed peel: If you’re not a fan of mixed peel or can’t find it, you can replace it with extra raisins, dried cranberries, or chopped dried apricots for a similar fruity bite.
- Mixed spice: Don’t have mixed spice? Make your own by combining 1 teaspoon cinnamon, ½ teaspoon nutmeg, and ½ teaspoon allspice. It’ll give you that same warm, spiced flavor.
- Raisins: Feel free to swap raisins with currants, sultanas, or even chocolate chips if you want to go in a different direction.
- White chocolate buttons: You can use a white chocolate bar chopped into small pieces, or substitute with milk or dark chocolate if that’s what you have. For the cross piping, you could also use regular icing made from powdered sugar and milk.
- Butter: While butter gives the best flavor and texture for these cookies, you can use margarine in a pinch. Just know the cookies might spread a bit more during baking.
Watch Out for These Mistakes While Baking
The biggest mistake with hot cross bun cookies is overworking the dough once you add the butter, which can make your cookies tough instead of tender – mix just until everything comes together and stop there.
Rolling the dough too thin or too thick will throw off your baking time, so stick to that 1/2 cm thickness and use a ruler if you need to, ensuring all cookies bake evenly in those 8-10 minutes.
Don’t skip letting the cookies cool completely before piping the white chocolate crosses, because warm cookies will melt the chocolate and turn your neat crosses into a runny mess.
If your raisins and mixed peel seem dry, soak them in warm water for 10 minutes and pat them dry before adding to the dough – this keeps them plump and prevents them from drawing moisture out of your cookies during baking.
What to Serve With Hot Cross Bun Cookies?
These cookies are perfect alongside a hot cup of tea or coffee for an afternoon snack or Easter brunch. I love serving them with a pot of English breakfast tea or a creamy latte, since the spices in the cookies pair really well with warm drinks. They’re also great on a dessert platter with fresh berries and whipped cream if you’re hosting a spring gathering. For a cozy breakfast, try them with scrambled eggs and fresh fruit, or simply enjoy them on their own as a sweet treat any time of day.
Storage Instructions
Store: Keep your hot cross bun cookies in an airtight container at room temperature for up to 5 days. They’ll stay soft and chewy if you tuck a piece of bread in the container with them. Just make sure the white chocolate crosses are fully set before stacking them, or they might stick together.
Freeze: These cookies freeze really well for up to 3 months. I like to freeze them before adding the white chocolate crosses, then pipe those on after thawing so they look fresh. If you’ve already decorated them, just layer parchment paper between each cookie to keep the crosses from smudging.
Enjoy: If you’ve frozen your cookies, let them thaw at room temperature for about 30 minutes before eating. They’re great straight from the container, but if you want that fresh-baked warmth, pop them in a 300°F oven for 3-4 minutes. The butter and spices really come alive when they’re slightly warm!
| Preparation Time | 45-60 minutes |
| Cooking Time | 10-15 minutes |
| Total Time | 55-75 minutes |
| Level of Difficulty | Medium |
| Servings | 24 cookies |
Estimated Nutrition
Estimated nutrition for the whole recipe (without optional ingredients):
- Calories: 2800-3000
- Protein: 28-32 g
- Fat: 155-170 g
- Carbohydrates: 330-350 g
Ingredients
For the dough:
- 11 oz all-purpose flour
- 3.75 oz sugar
- 7 oz butter
- 1.25 oz raisins (soaked in warm water for 10 minutes to make them plump)
- 1.25 oz mixed peel
- 2.5 tsp mixed spice
- 1/4 tsp salt
For the glaze:
- 1 egg white (room temperature, about 70°F)
- 1.5 tbsp sugar
For the decoration:
- 3 oz white chocolate (melted and cooled to room temperature)
Step 1: Prepare Mise en Place and Soak Dried Fruit
- 1.25 oz raisins
- warm water
Soak the raisins in warm water for 10 minutes to plump them up, then drain well and pat dry on paper towels.
While they soak, measure out all your ingredients and have them ready—this is essential for cookie doughs that come together quickly.
Preheat your oven to 170°C (340°F) so it’s ready when you need it.
Step 2: Build the Cookie Dough
- 11 oz all-purpose flour
- 3.75 oz sugar
- 2.5 tsp mixed spice
- 1/4 tsp salt
- 7 oz butter
- plumped raisins from Step 1
- 1.25 oz mixed peel
In a large bowl, combine the flour, sugar, mixed spice, and salt.
Cut the butter into small cubes and add it to the dry mixture.
Using your fingertips or a pastry cutter, work the butter into the flour until the mixture resembles coarse breadcrumbs—this creates a tender crumb structure in the final cookies.
Fold in the drained raisins and mixed peel until they’re evenly distributed throughout the dough.
The dough should come together as a cohesive ball; if it feels too dry, add a few drops of water.
Step 3: Roll, Cut, and Prepare for Baking
- cookie dough from Step 2
- 1 egg white
- 1.5 tbsp sugar
On a lightly floured surface, roll out the dough from Step 2 to about 1/2 cm (roughly 1/4 inch) thickness.
Using a round cookie cutter or the rim of a glass, cut out circles and place them on a lined baking sheet, spacing them about 2 cm apart.
In a small bowl, whisk together the egg white and 1.5 tbsp sugar until frothy.
Brush the top of each cookie generously with this egg white mixture—this creates the glossy finish characteristic of hot cross buns.
Step 4: Bake the Cookies
Place the baking sheet in your preheated 170°C oven and bake for 8-10 minutes until the cookies are golden brown around the edges but still pale on top.
I find that cookies baked at this lower temperature develop a better texture than those baked hotter—they stay tender inside while the outsides set properly.
Remove from the oven and let cool on the baking sheet for 5 minutes, then transfer to a wire rack to cool completely.
Step 5: Pipe the White Chocolate Cross
- 3 oz white chocolate
- cooled cookies from Step 4
Once the cookies from Step 4 have cooled completely, melt the white chocolate (either in the microwave in 20-second bursts or over a double boiler, stirring frequently).
Let it cool to room temperature so it’s still pourable but not so hot it spreads uncontrollably.
Transfer the melted white chocolate to a piping bag fitted with a small round tip or a squeeze bottle.
Pipe a cross pattern on top of each cookie—two perpendicular lines that create the iconic hot cross bun design.

White Chocolate Hot Cross Bun Cookies
Ingredients
For the dough
- 11 oz all-purpose flour
- 3.75 oz sugar
- 7 oz butter
- 1.25 oz raisins (soaked in warm water for 10 minutes to make them plump)
- 1.25 oz mixed peel
- 2.5 tsp mixed spice
- 1/4 tsp salt
For the glaze
- 1 egg white (room temperature, about 70°F)
- 1.5 tbsp sugar
For the decoration
- 3 oz white chocolate (melted and cooled to room temperature)
Instructions
- Soak the raisins in warm water for 10 minutes to plump them up, then drain well and pat dry on paper towels. While they soak, measure out all your ingredients and have them ready—this is essential for cookie doughs that come together quickly. Preheat your oven to 170°C (340°F) so it's ready when you need it.
- In a large bowl, combine the flour, sugar, mixed spice, and salt. Cut the butter into small cubes and add it to the dry mixture. Using your fingertips or a pastry cutter, work the butter into the flour until the mixture resembles coarse breadcrumbs—this creates a tender crumb structure in the final cookies. Fold in the drained raisins and mixed peel until they're evenly distributed throughout the dough. The dough should come together as a cohesive ball; if it feels too dry, add a few drops of water.
- On a lightly floured surface, roll out the dough from Step 2 to about 1/2 cm (roughly 1/4 inch) thickness. Using a round cookie cutter or the rim of a glass, cut out circles and place them on a lined baking sheet, spacing them about 2 cm apart. In a small bowl, whisk together the egg white and 1.5 tbsp sugar until frothy. Brush the top of each cookie generously with this egg white mixture—this creates the glossy finish characteristic of hot cross buns.
- Place the baking sheet in your preheated 170°C oven and bake for 8-10 minutes until the cookies are golden brown around the edges but still pale on top. I find that cookies baked at this lower temperature develop a better texture than those baked hotter—they stay tender inside while the outsides set properly. Remove from the oven and let cool on the baking sheet for 5 minutes, then transfer to a wire rack to cool completely.
- Once the cookies from Step 4 have cooled completely, melt the white chocolate (either in the microwave in 20-second bursts or over a double boiler, stirring frequently). Let it cool to room temperature so it's still pourable but not so hot it spreads uncontrollably. Transfer the melted white chocolate to a piping bag fitted with a small round tip or a squeeze bottle. Pipe a cross pattern on top of each cookie—two perpendicular lines that create the iconic hot cross bun design.
