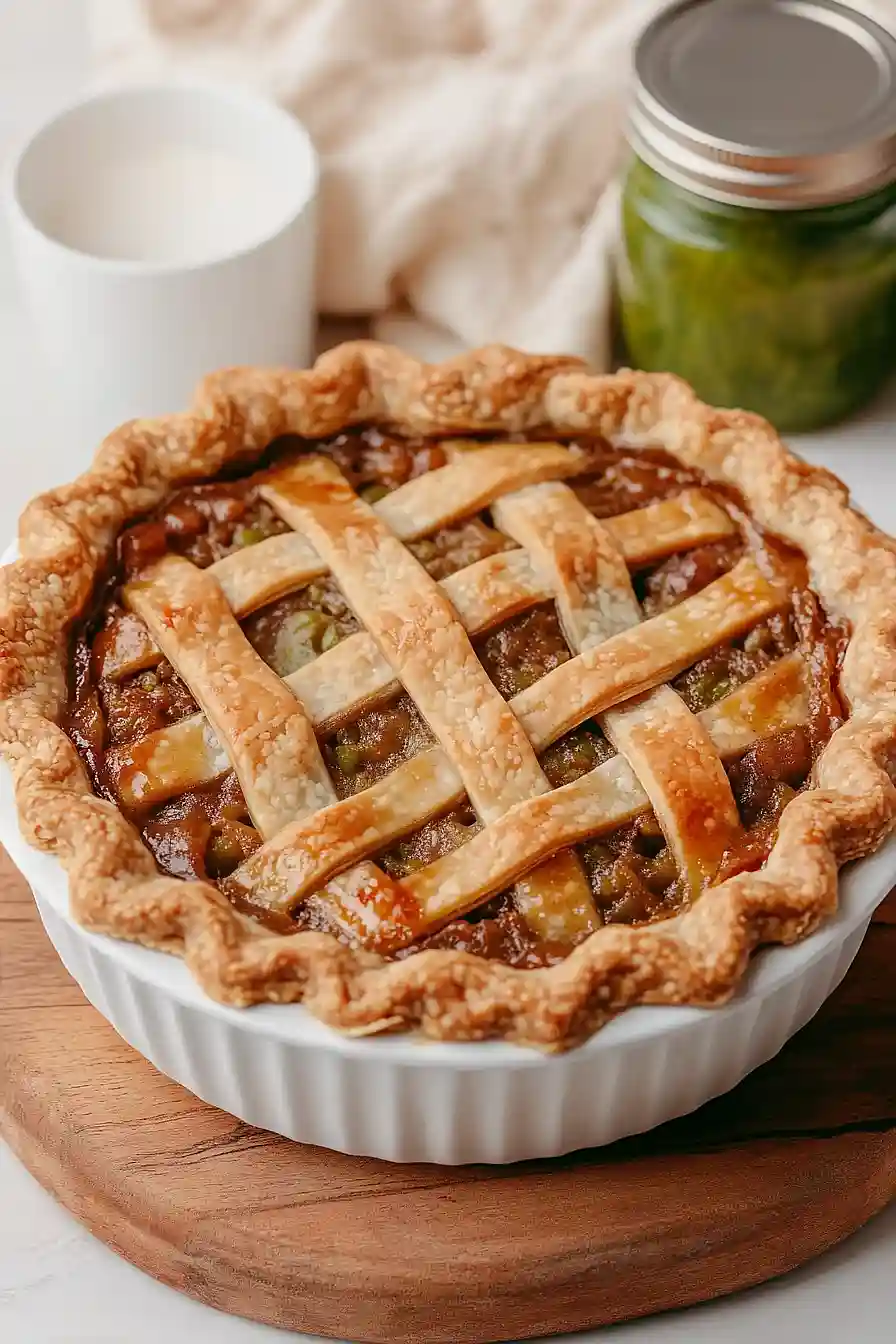
Have you ever found yourself staring at a pile of green tomatoes from your garden, wondering what to do with them before the first frost hits? I know I’ve been there – watching those stubborn tomatoes refuse to ripen as autumn creeps closer. While fried green tomatoes are always an option, I’ve discovered something even better: green tomato apple pie filling.
This unexpected combination brings together the mild tartness of green tomatoes and the natural sweetness of apples to create a filling that’s both practical and tasty. It’s perfect for using up those end-of-season tomatoes, and most people won’t even guess they’re eating anything but a classic apple pie.

Why You’ll Love This Green Tomato Apple Pie Filling
- Smart way to use green tomatoes – This recipe helps you make the most of those end-of-season green tomatoes that would otherwise go to waste. It’s a clever way to transform them into something completely different and delicious.
- Make-ahead convenience – Once you prepare and can this filling, you’ll have ready-to-use pie filling whenever you need it. Perfect for unexpected guests or quick desserts throughout the year.
- Classic fall flavors – The combination of warm spices like cinnamon, nutmeg, and cloves, plus apples and raisins, creates that cozy autumn taste we all love in our pies.
- Budget-friendly – Using green tomatoes as a base ingredient makes this filling much more economical than traditional all-apple pie fillings, especially if you grow your own tomatoes.
- Unique conversation starter – Your friends and family won’t believe there are tomatoes in this pie filling – it’s a fun secret ingredient that makes for great dinner table conversation!
What Kind of Green Tomatoes Should I Use?
For this pie filling, you’ll want to use unripe regular tomatoes that are completely green, not heirloom varieties that stay green when ripe. The best green tomatoes for this recipe are firm, medium-sized ones that feel heavy for their size and have a bright, uniform green color. If you’re harvesting end-of-season tomatoes from your garden, pick the ones that are fully grown but haven’t started showing any signs of ripening – these will have the perfect tart flavor and firm texture needed for the filling. Just make sure to avoid any tomatoes with blemishes or soft spots, as these won’t hold up well during cooking.

Options for Substitutions
This unique pie filling recipe allows for some creative swaps, though certain ingredients are key to its success:
- Green tomatoes: These are essential and shouldn’t be substituted with ripe tomatoes as they have different texture and pectin levels. However, if you’re a bit short, you can make up the difference with extra tart apples.
- Apples: Any firm, tart cooking apples work well here – Granny Smith, Northern Spy, or Bramley apples are good choices. Avoid softer varieties like Red Delicious.
- Raisins: You can use all dark or all golden raisins if you prefer. Dried cranberries or chopped dried apricots can replace up to half the raisins for a different flavor profile.
- Citrus peel: Mix and match any combination of lemon, orange, or lime peel. In a pinch, use 2 tablespoons of pure citrus extract instead.
- Kitchen Bouquet: This is optional for color. You can skip it or use a drop of gravy browning sauce instead.
- Sugars: You can use all brown or all white sugar, though this might change the color and flavor slightly. The total amount should stay the same.
- Spices: Feel free to adjust the spice blend to your taste. Apple pie spice or pumpkin pie spice can be used instead of the individual spices – use about 3 tablespoons total.
Watch Out for These Mistakes While Cooking
The biggest challenge when making green tomato pie filling is getting the right texture – chopping the tomatoes too coarsely can lead to a chunky, uneven filling that won’t taste or feel like traditional apple pie filling. A food processor can help achieve uniform pieces, but be careful not to turn them into mush by over-processing. Another common mistake is not draining the tomatoes well enough before cooking, which can result in a watery filling that won’t set properly. To ensure the best flavor development, don’t rush the cooking process – let the mixture simmer until it reaches a thick, syrupy consistency and the tomatoes become translucent, which usually takes about 45-60 minutes. For optimal safety when canning, make sure to maintain a consistent boil throughout the cooking process and follow proper sterilization procedures for your jars and lids – skipping these steps could lead to spoilage.
What to Serve With Green Tomato Apple Pie Filling?
This unique pie filling is perfect as the star ingredient in a traditional pie crust, but there are so many other ways to enjoy it! Try warming it up and spooning it over vanilla ice cream for a quick dessert, or serve it alongside some sharp cheddar cheese for a sweet-savory combo that really works. The filling also makes a great topping for pancakes or waffles at breakfast time, and pairs nicely with a dollop of whipped cream or a scoop of butter pecan ice cream. If you’re serving it as a pie, a cup of hot coffee or spiced chai tea makes the perfect beverage companion.
Storage Instructions
Preserve: Once properly canned in sterilized jars, this pie filling will keep well in a cool, dark pantry for up to 12 months. Make sure the jars are sealed tight – you should hear that satisfying ‘pop’ sound when they cool down! Keep an eye on the color; while it might darken slightly over time, that’s totally normal.
Keep Fresh: After opening a jar, transfer any unused portion to an airtight container and pop it in the fridge. It’ll stay good for about 2 weeks, which gives you plenty of time to use it up in different pies or as a tasty topping for ice cream!
Make Ahead: This recipe is perfect for making ahead during green tomato season. You can prepare a bunch of jars and have homemade pie filling ready whenever you need it. It’s especially handy during the holidays when you want to whip up a quick pie without starting from scratch.
| Preparation Time | 15-20 minutes |
| Cooking Time | 40-60 minutes |
| Total Time | 55-80 minutes |
| Level of Difficulty | Medium |
Estimated Nutrition
Estimated nutrition for the whole recipe (without optional ingredients):
- Calories: 6000-6800
- Protein: 10-15 g
- Fat: 5-10 g
- Carbohydrates: 1500-1700 g
Ingredients
- 4 kg finely chopped green tomatoes (8 lbs or about 4 us quarts, measured after chopping)
- 1.5 kg apples
- 500 g dark seedless raisins (approximately 2 3/4 cups or 1 pound)
- 500 g golden seedless raisins (around 2 3/4 cups or 1 pound)
- 4 tablespoons grated citrus peel (refer to notes)
- 500 ml water (2 cups or 16 oz)
- 125 ml vinegar with at least 5% acidity (1/2 cup or 4 oz)
- 250 ml bottled lemon juice (1 cup or 8 oz)
- 2 tablespoons ground cinnamon
- 1 teaspoon ground nutmeg
- 1 teaspoon ground cloves
- 1 tablespoon kitchen bouquet (optional, to enhance color)
- 500 g medium-packed brown sugar (about 2 1/2 cups or 18 oz)
- 500 g white sugar (2 1/2 cups or about 20 oz)
Step 1: Prep Ingredients and Combine
Begin by preparing all your ingredients according to your recipe.
Once prepped, place everything into a large pot.
Stir the ingredients thoroughly to ensure they are well combined.
Step 2: Cook the Mixture
Set the pot on the stove and bring the mixture to a boil over medium-high heat.
Once it reaches a boil, reduce the heat to achieve a gentle simmer.
Let the mixture simmer uncovered for about 40 minutes, stirring often.
This will allow the ingredients to become tender and the mixture to thicken slightly.
Step 3: Prepare the Jars for Canning
After the mixture has thickened, ladle it into 1-liter (1 US quart / 32 oz) jars.
Be sure to leave a 2 cm (1/2 inch) headspace at the top of each jar.
Debubble each jar carefully to remove trapped air, and adjust the headspace if necessary.
After that, wipe the rims of the jars clean to ensure a good seal.
Place the lids on the jars, screwing the bands on until they are just fingertip-tight.
Step 4: Process Jars in a Canner
Process the filled jars in a water bath or steam canner according to the manufacturer’s instructions.
The jars should be processed for 15 minutes, but be sure to increase the processing time if you are at a higher altitude, as altitude affects the time required for safe canning.
Step 5: Cool and Store
Once processing is complete, carefully remove the jars from the canner and let them cool on a towel or cooling rack.
Do not disturb them while they cool.
After 24 hours, check the seals to ensure they have sealed properly.
Store the sealed jars in a cool, dark place.
Enjoy your preserved creation when ready!
