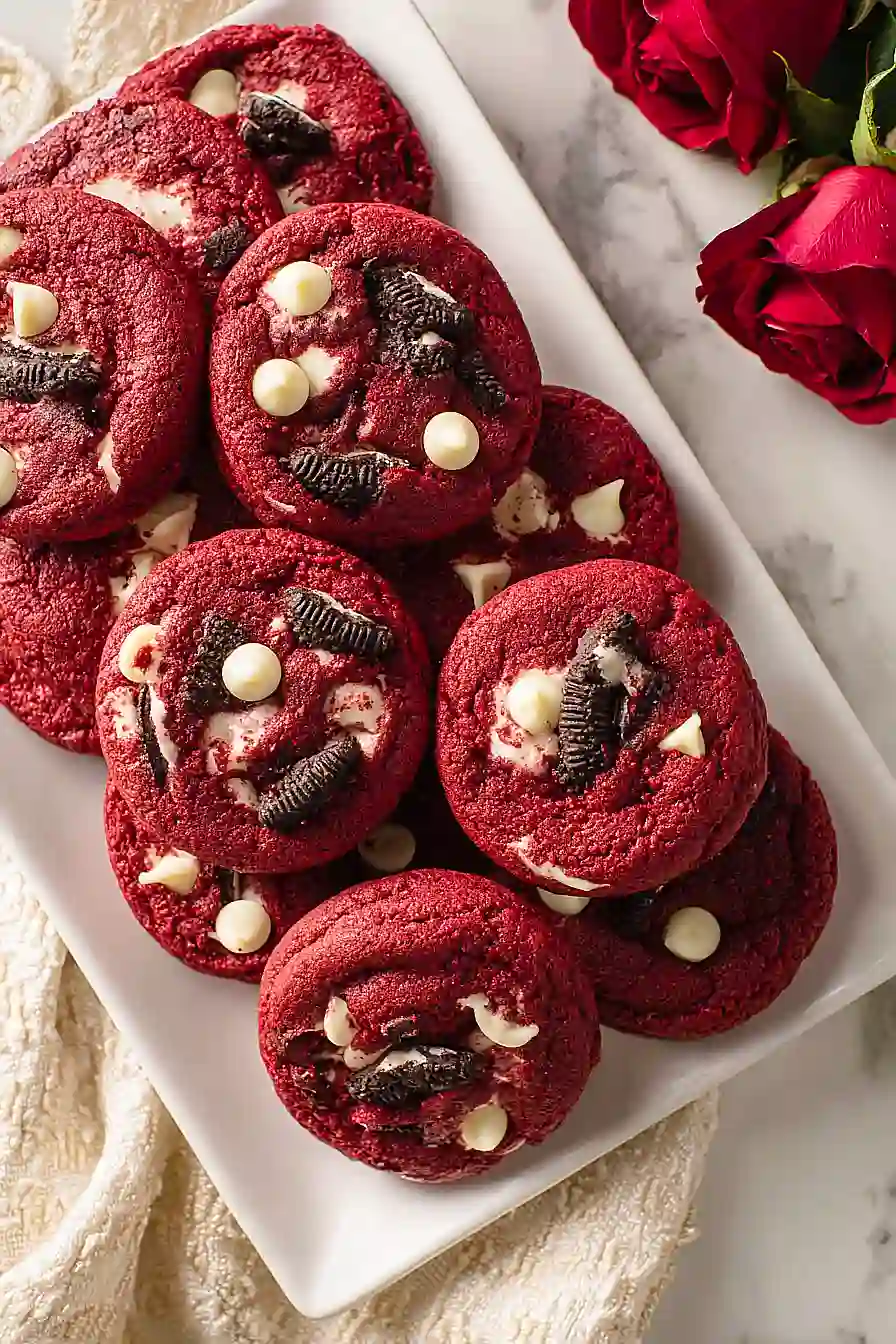
If you ask me, red velvet anything is always a good idea, but red velvet meets Oreos? Even better.
These cookies combine the mild cocoa flavor of red velvet cake with chunks of everyone’s favorite sandwich cookie. A bit of espresso powder deepens the chocolate notes, while white chocolate chips add pockets of sweetness.
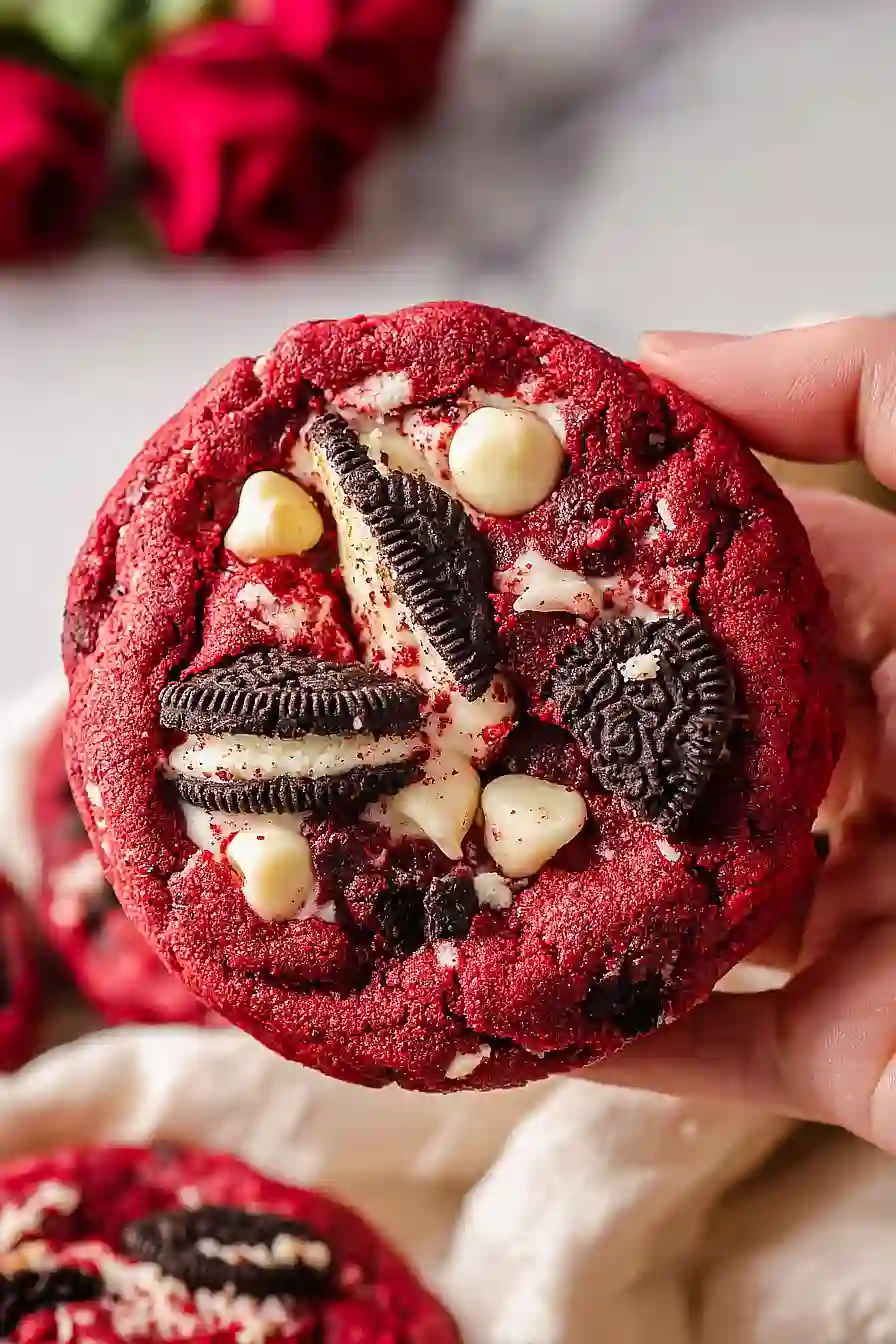
The dough comes together like a classic chocolate chip cookie, with the addition of red food coloring and chopped Oreos folded in at the end. They bake up soft and chewy with crispy edges.
It’s a fun twist on traditional cookies that’s perfect for Valentine’s Day, Christmas, or really any time you want something a little different.
Why You’ll Love These Red Velvet Oreo Cookies
- Show-stopping presentation – The bright red color combined with Oreos baked right into each cookie makes these look like they came from a fancy bakery, perfect for parties or Valentine’s Day.
- Two desserts in one – You get the classic red velvet flavor with a surprise Oreo center and white chocolate chips throughout, giving you multiple textures and flavors in every bite.
- Easy to make – Despite looking impressive, these cookies come together in under an hour with straightforward mixing and baking steps.
- Crowd-pleaser – Everyone loves red velvet and Oreos, so combining them guarantees these will disappear fast at any gathering or bake sale.
What Kind of Oreos Should I Use?
For this recipe, regular Oreos work perfectly fine, but you can definitely get creative with your choice. The classic chocolate sandwich cookies provide that signature crunch and cream filling that makes these cookies special, though Double Stuf Oreos will give you extra creaminess if that’s your thing. You can even try flavored varieties like mint or peanut butter Oreos to add a fun twist to your red velvet cookies. Just make sure to use whole Oreos rather than crushing them – you want those big chunks throughout the cookie for the best texture and visual appeal.

Options for Substitutions
These cookies are pretty adaptable, so here are some swaps you can make:
- Butter: You can use margarine or a butter substitute if needed, though real butter gives the best flavor and texture. Make sure whatever you use is at room temperature for proper mixing.
- Brown sugar: If you’re out of brown sugar, mix 1 3/4 cups white sugar with 2 tablespoons of molasses. You can also use all white sugar, but the cookies will be slightly less chewy.
- White chocolate chips: Feel free to swap these with semi-sweet chocolate chips, milk chocolate chips, or even dark chocolate chips. You could also use a mix of different chips for variety.
- Oreos: Regular Oreos are the classic choice, but you can experiment with different Oreo flavors like golden, mint, or peanut butter. Just keep the same amount.
- Red food coloring: If you want to avoid artificial coloring, try using beet powder (start with 2-3 tablespoons) for a natural red tint, though the color won’t be quite as bright. You can also skip the coloring entirely for chocolate cookies.
- Vanilla essence: Vanilla extract works just as well as vanilla essence. You can also try almond extract for a different flavor profile, but use only 1 teaspoon as it’s stronger.
Watch Out for These Mistakes While Baking
The biggest mistake with these cookies is skipping the chilling step, which prevents them from spreading too thin and becoming flat pancakes instead of thick, chewy cookies – that 30 minutes in the fridge is non-negotiable.
Another common error is overbaking, so pull your cookies out when the edges are set but the centers still look slightly underdone, as they’ll continue cooking on the hot baking sheet and firm up as they cool.
Be careful not to go overboard with the red food coloring, as too much can affect the taste and texture – two bottles sounds like a lot, but add it gradually until you get that signature red velvet color.
Finally, make sure your butter is softened to room temperature (not melted) before mixing, which helps create the right cookie texture and prevents greasy, flat results.
What to Serve With Red Velvet Oreo Cookies?
These cookies are pretty rich and indulgent on their own, so I love pairing them with a cold glass of milk – it’s the perfect way to balance out all that sweetness. If you’re serving them at a party or gathering, consider setting out some vanilla ice cream so people can make cookie ice cream sandwiches, which is always a crowd-pleaser. Coffee or hot chocolate also works great alongside these cookies, especially during the colder months when you want something warm to sip on. For a fun dessert spread, you could serve them with fresh strawberries or raspberries, which add a nice tart contrast to the sweet cookie and complement the red velvet flavor.
Storage Instructions
Store: Keep these red velvet Oreo cookies in an airtight container at room temperature for up to 5 days. I like to toss a slice of bread in the container to help keep them soft and chewy. They’re perfect for grabbing as a quick snack or packing in lunchboxes throughout the week.
Freeze: These cookies freeze really well for up to 3 months. You can freeze them already baked in a freezer-safe container with parchment paper between layers, or freeze the dough as individual balls on a baking sheet before transferring to a bag. Baking from frozen just takes an extra minute or two in the oven.
Enjoy: If you’re eating them from the freezer, just let them sit at room temperature for about 10-15 minutes to soften up. Some people actually love eating them straight from the freezer for a cool treat, especially in the summer!
| Preparation Time | 30-40 minutes |
| Cooking Time | 10-15 minutes |
| Total Time | 40-55 minutes |
| Level of Difficulty | Medium |
| Servings | 20 cookies |
Estimated Nutrition
Estimated nutrition for the whole recipe (without optional ingredients):
- Calories: 6300-6700
- Protein: 60-70 g
- Fat: 300-330 g
- Carbohydrates: 870-930 g
Ingredients
For the dry ingredients:
- 4 1/4 cups flour (I always use King Arthur all-purpose flour)
- 1/2 cup cocoa (sifted to remove lumps)
- 1 tsp salt
- 2 tsp baking soda
- 1/2 teaspoon espresso powder
For the wet mixture:
- 1.5 cups butter (I like Kerrygold unsalted butter for this)
- 3/4 cup sugar
- 1 3/4 cups brown sugar
- 3 eggs (room temperature, about 70°F)
- 2 tsp vanilla
- 2 fl oz red food coloring
For the mix-ins:
- 1.5 cups white chocolate chips (I prefer Ghirardelli for a better melt)
- 24 oreos (roughly chopped into 1/2-inch pieces)
Step 1: Prepare Dry Ingredients and Mix Wet Base
- 4 1/4 cups flour
- 1/2 cup cocoa
- 1 tsp salt
- 2 tsp baking soda
- 1/2 teaspoon espresso powder
- 1.5 cups butter
- 3/4 cup sugar
- 1 3/4 cups brown sugar
- 3 eggs
- 2 tsp vanilla
- 2 fl oz red food coloring
In one bowl, whisk together flour, sifted cocoa powder, salt, baking soda, and espresso powder—whisking helps distribute the cocoa and leavening agents evenly for consistent texture.
In a separate large bowl, cream together butter, sugar, and brown sugar until light and fluffy, about 2-3 minutes, which incorporates air and creates a tender cookie.
Add room temperature eggs one at a time, beating well after each addition, then mix in vanilla and red food coloring until the mixture is evenly tinted.
Step 2: Combine Wet and Dry Ingredients
- dry ingredient mixture from Step 1
- wet ingredient mixture from Step 1
Add the dry ingredient mixture from Step 1 to the wet ingredients in stages, stirring until just combined after each addition—overmixing develops gluten and can make cookies tough.
Mix until no streaks of flour remain but stop as soon as the dough comes together.
The dough should be thick and well-colored from the red food coloring.
Step 3: Prepare and Fold in Cookie and Chocolate Pieces
- 24 oreos
- 1.5 cups white chocolate chips
While the dough rests for a minute, roughly chop the Oreos into approximately 1/2-inch pieces—I find hand-breaking them into varied sizes creates better texture than uniform chunks, since some pieces get crispy while others stay chewy.
Fold the chopped Oreos and white chocolate chips into the dough using a spatula or wooden spoon until evenly distributed throughout.
Don’t overmix at this stage; just ensure the mix-ins are incorporated.
Step 4: Shape and Chill Dough
- dough from Step 3
Using a cookie scoop or your hands, shape the dough into 20 balls about the size of golf balls, spacing them about 2 inches apart on parchment-lined baking sheets.
Gently press each ball down slightly with the heel of your hand to create a uniform thickness—this helps them bake more evenly.
Place the baking sheets in the refrigerator for at least 30 minutes; chilling prevents excessive spreading and helps the cookies hold their shape during baking.
Step 5: Bake and Cool
- shaped dough from Step 4
Preheat your oven to 375°F and bake the chilled cookies for 12 minutes, until the edges are set but the centers still look slightly underbaked—they’ll continue cooking on the hot pan after removal.
Let the cookies cool on the baking sheet for 5 minutes to firm up, then transfer to a wire rack.
I like to let them cool completely before serving so the white chocolate has time to set and the Oreo pieces stay distinct from the cake texture.

Quick Red Velvet Oreo Cookies
Ingredients
For the dry ingredients::
- 4 1/4 cups flour (I always use King Arthur all-purpose flour)
- 1/2 cup cocoa (sifted to remove lumps)
- 1 tsp salt
- 2 tsp baking soda
- 1/2 teaspoon espresso powder
For the wet mixture::
- 1.5 cups butter (I like Kerrygold unsalted butter for this)
- 3/4 cup sugar
- 1 3/4 cups brown sugar
- 3 eggs (room temperature, about 70°F)
- 2 tsp vanilla
- 2 fl oz red food coloring
For the mix-ins::
- 1.5 cups white chocolate chips (I prefer Ghirardelli for a better melt)
- 24 oreos (roughly chopped into 1/2-inch pieces)
Instructions
- In one bowl, whisk together flour, sifted cocoa powder, salt, baking soda, and espresso powder—whisking helps distribute the cocoa and leavening agents evenly for consistent texture. In a separate large bowl, cream together butter, sugar, and brown sugar until light and fluffy, about 2-3 minutes, which incorporates air and creates a tender cookie. Add room temperature eggs one at a time, beating well after each addition, then mix in vanilla and red food coloring until the mixture is evenly tinted.
- Add the dry ingredient mixture from Step 1 to the wet ingredients in stages, stirring until just combined after each addition—overmixing develops gluten and can make cookies tough. Mix until no streaks of flour remain but stop as soon as the dough comes together. The dough should be thick and well-colored from the red food coloring.
- While the dough rests for a minute, roughly chop the Oreos into approximately 1/2-inch pieces—I find hand-breaking them into varied sizes creates better texture than uniform chunks, since some pieces get crispy while others stay chewy. Fold the chopped Oreos and white chocolate chips into the dough using a spatula or wooden spoon until evenly distributed throughout. Don't overmix at this stage; just ensure the mix-ins are incorporated.
- Using a cookie scoop or your hands, shape the dough into 20 balls about the size of golf balls, spacing them about 2 inches apart on parchment-lined baking sheets. Gently press each ball down slightly with the heel of your hand to create a uniform thickness—this helps them bake more evenly. Place the baking sheets in the refrigerator for at least 30 minutes; chilling prevents excessive spreading and helps the cookies hold their shape during baking.
- Preheat your oven to 375°F and bake the chilled cookies for 12 minutes, until the edges are set but the centers still look slightly underbaked—they'll continue cooking on the hot pan after removal. Let the cookies cool on the baking sheet for 5 minutes to firm up, then transfer to a wire rack. I like to let them cool completely before serving so the white chocolate has time to set and the Oreo pieces stay distinct from the cake texture.
