I didn’t try cheesecake until I was in my twenties, and when I finally did, I couldn’t believe what I’d been missing. My mom wasn’t much of a baker, so fancy desserts never made it to our table growing up. But once I discovered how good a creamy, rich cheesecake could be, I was hooked.
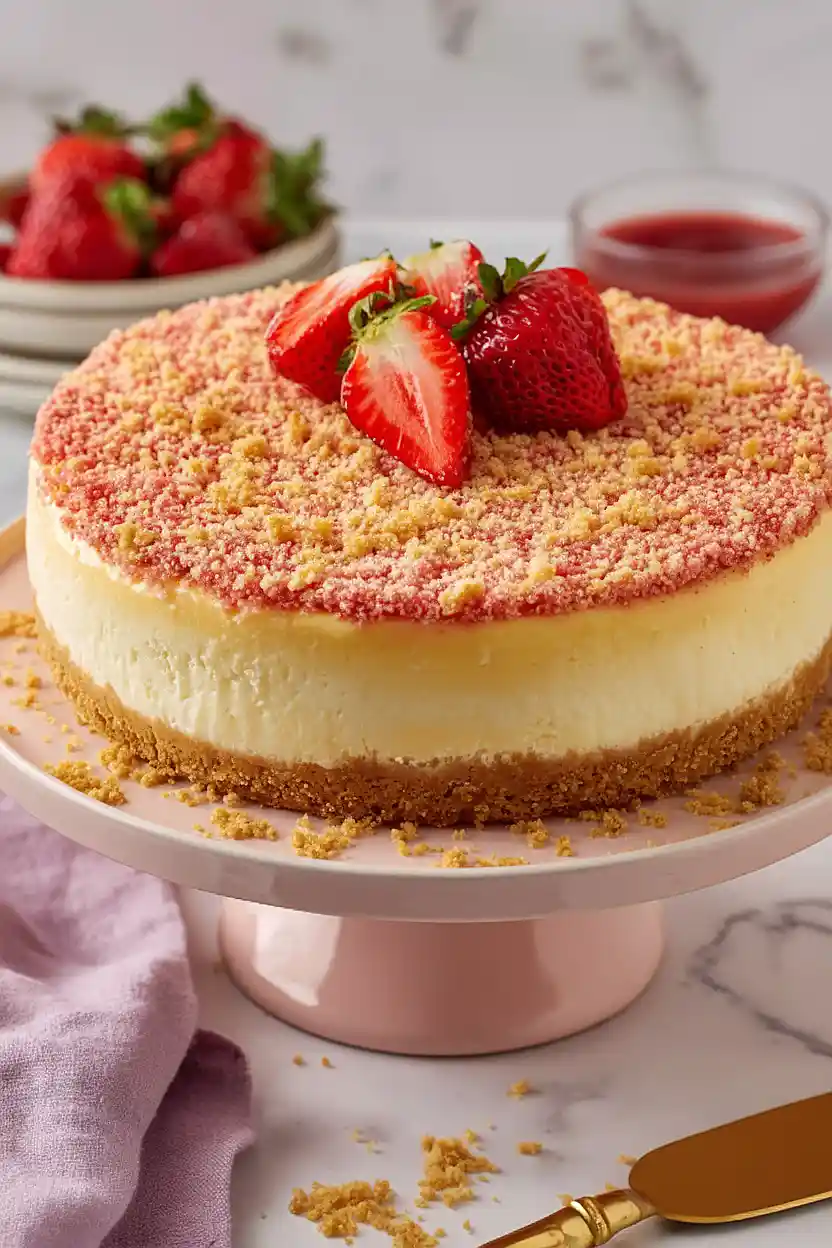
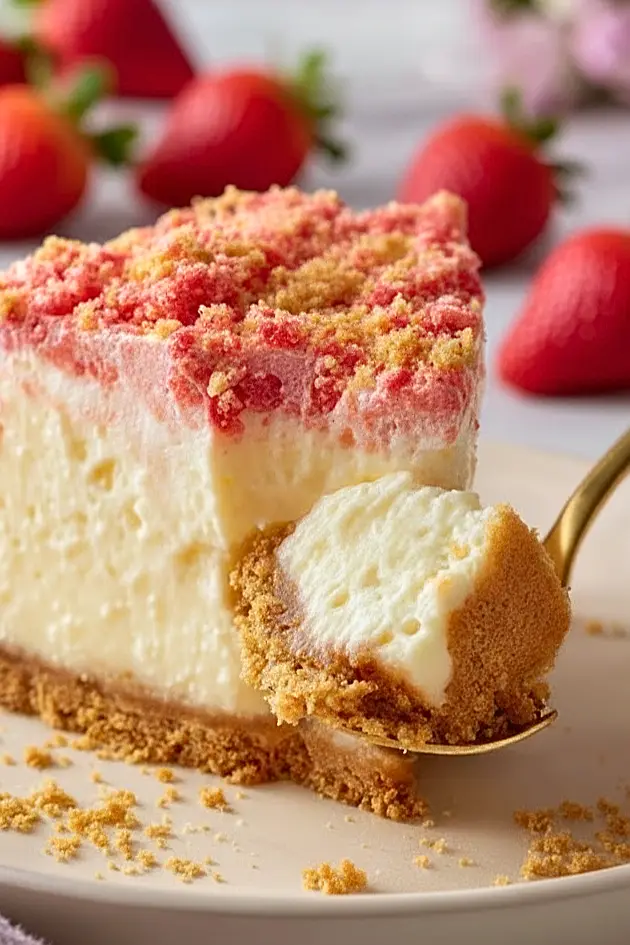
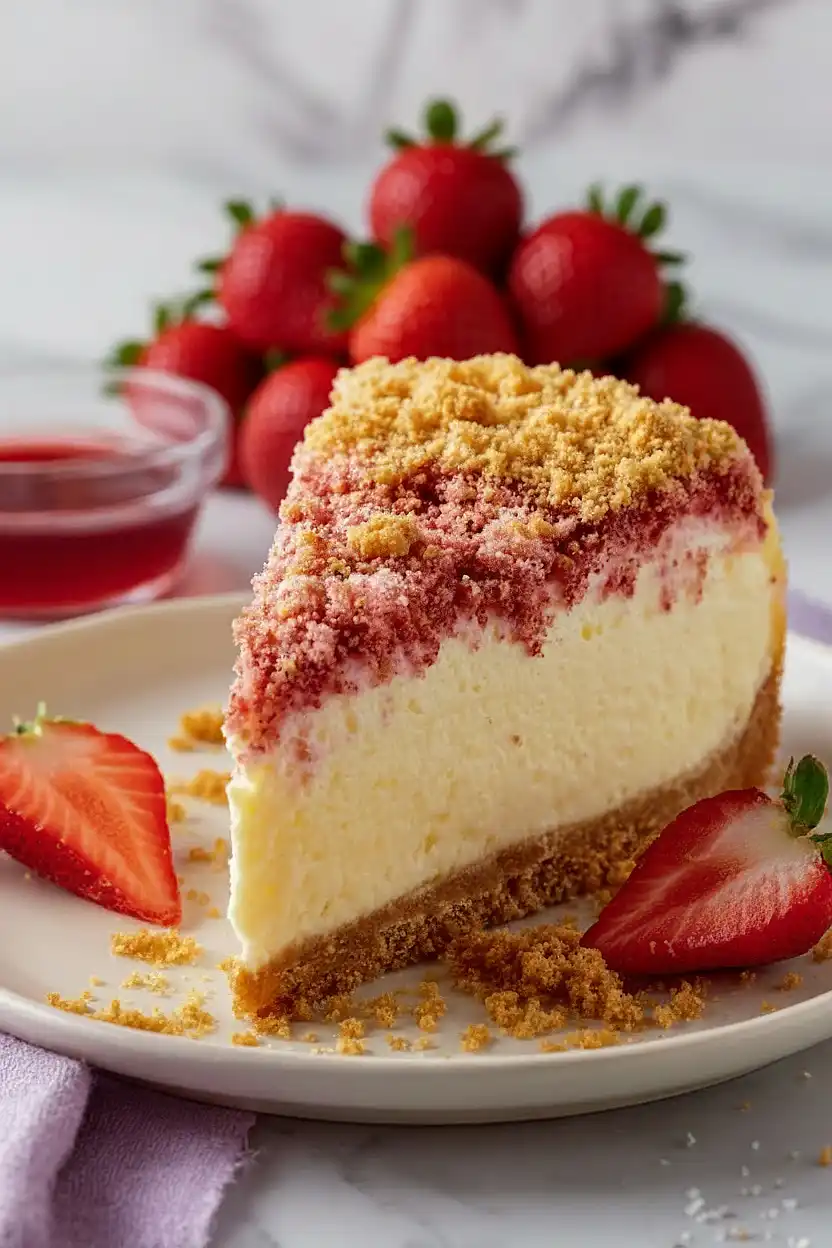
This strawberry crunch version takes regular cheesecake and adds something fun—a crispy, sweet topping made with Golden Oreos and freeze-dried strawberries. The crunch against the smooth filling is what makes it special. You get that satisfying texture contrast in every bite, plus the strawberry flavor running through the whole thing ties it all together. It looks like it came from a bakery, but it’s way easier to make than you’d think.
Why You’ll Love This Strawberry Crunch Cheesecake
- Nostalgic strawberry crunch topping – That iconic crunchy layer made with golden Oreos and dried strawberries brings back memories of those classic ice cream bars we all loved as kids.
- Creamy, rich cheesecake base – The smooth cream cheese filling is perfectly balanced with just the right amount of sweetness and a hint of vanilla.
- Show-stopping dessert – This cheesecake looks impressive enough for special occasions but is totally doable for home bakers who want to wow their guests.
- Perfect texture combination – You get the best of both worlds with the crunchy topping contrasting beautifully against the silky cheesecake filling.
What Kind of Cream Cheese Should I Use?
For cheesecake, you’ll want to stick with full-fat brick-style cream cheese – the kind that comes in the rectangular foil-wrapped blocks, not the spreadable tub variety. The spreadable versions have added ingredients that can make your cheesecake too soft and prevent it from setting properly. Make sure your cream cheese is at room temperature before you start mixing, which usually takes about an hour on the counter. If you forget to take it out ahead of time, you can cut it into cubes to help it soften faster, but avoid microwaving it as that can create an uneven texture in your finished cheesecake.
Options for Substitutions
This recipe has some room for swaps, though a few ingredients are best kept as-is:
- Golden Oreos: Regular Oreos work fine here, though they’ll give you a darker crust. Graham crackers are another option – you’ll need about 2 cups of crumbs plus an extra tablespoon of butter.
- Dried strawberries: Freeze-dried strawberries are your best bet if you can’t find dried ones. They’re lighter and crunchier, which actually works great for that signature crunch topping.
- Cream cheese: Stick with full-fat cream cheese for this one – low-fat versions will make your cheesecake too soft and won’t set properly. This is one ingredient you don’t want to substitute.
- Sour cream: Greek yogurt works as a swap here, but make sure it’s full-fat to maintain that creamy texture.
- Strawberry jello: If you don’t have strawberry jello powder, you can leave it out or use a tablespoon of freeze-dried strawberry powder for color and flavor.
- American buttercream: Cream cheese frosting makes a nice alternative here and keeps with the cheesecake theme. You can also use whipped cream if you prefer something lighter.
Watch Out for These Mistakes While Baking
The biggest mistake with cheesecake is cracking on top, which happens when you overbake it or cool it too quickly – the cheesecake is done when the edges are set but the center still has a slight jiggle, like Jello.
Make sure your cream cheese is truly at room temperature before mixing, because cold cream cheese creates lumps that are nearly impossible to smooth out, and always scrape down the bowl between additions to ensure everything is fully incorporated.
Skipping the water bath or letting water seep into your springform pan will ruin the texture, so wrap the bottom and sides of your pan tightly with two layers of aluminum foil before placing it in the larger pan.
Finally, resist the urge to open the oven door during baking, as sudden temperature changes are a major cause of cracks, and let the cheesecake cool gradually in the turned-off oven with the door slightly open for about an hour before refrigerating.
What to Serve With Strawberry Crunch Cheesecake?
This cheesecake is pretty rich and sweet on its own, so I like to keep things simple when serving it. A hot cup of coffee or a cold glass of milk is really all you need to balance out the creamy sweetness. If you’re serving this at a party, fresh strawberries on the side are always a good idea – they add a nice fresh contrast to the dessert. You could also whip up some lightly sweetened whipped cream for people who want an extra dollop on top, though honestly, with all that strawberry crunch topping, it’s already pretty indulgent as is!
Storage Instructions
Store: Keep your strawberry crunch cheesecake covered in the fridge for up to 5 days. I like to use plastic wrap directly on the surface first, then cover the whole pan with foil to keep it from drying out. The crunchy topping might soften a bit over time, but it still tastes amazing.
Freeze: This cheesecake freezes really well for up to 2 months. I recommend slicing it first and wrapping each piece individually in plastic wrap, then placing them in a freezer bag. That way you can grab a slice whenever you’re craving it without thawing the whole thing.
Serve: For the best texture, let your cheesecake sit at room temperature for about 30 minutes before serving. If you’re working with frozen slices, let them thaw in the fridge overnight. You might want to add a fresh sprinkle of the strawberry crunch topping right before serving to bring back that satisfying crispiness.
| Preparation Time | 20-30 minutes |
| Cooking Time | 75-90 minutes |
| Total Time | 95-120 minutes |
| Level of Difficulty | Medium |
| Servings | 14 slices |
Estimated Nutrition
Estimated nutrition for the whole recipe (without optional ingredients):
- Calories: 5200-5800
- Protein: 55-65 g
- Fat: 340-390 g
- Carbohydrates: 530-600 g
Ingredients
For the crust:
- 24 Golden Oreo sandwich cookies
- 1/2 cup freeze-dried strawberries (crushed for better crunch)
- 2 tbsp strawberry gelatin powder
- 5 tbsp unsalted butter (melted and cooled)
- 1/4 tsp salt
For the cheesecake:
- 32 oz cream cheese (softened)
- 1 1/2 cups granulated sugar
- 4 large eggs (room temperature)
- 1/2 cup sour cream (full fat)
- 1 1/2 tbsp vanilla extract
- 1 tsp lemon zest
- 3 tbsp all-purpose flour
- 3/4 tsp salt
For the topping:
- 1/2 cup strawberry syrup
- 1 1/2 cups buttercream or whipped topping
- 6-8 fresh strawberries (halved for garnish)
Step 1: Prepare the Crust and Preheat
- 24 Golden Oreo sandwich cookies
- 1/2 cup freeze-dried strawberries
- 5 tbsp unsalted butter
- 2 tbsp sugar
- 1/4 tsp salt
Preheat your oven to 350°F.
While it heats, grind the Golden Oreo cookies and crushed freeze-dried strawberries together in a food processor until you achieve a fine, sandy texture with some small chunks remaining for crunch.
Transfer the mixture to a bowl and set aside 1 cup of crumbs for topping later—this gives you that signature textural contrast.
Mix the remaining crumbs with melted butter, 2 tablespoons sugar, and salt until it resembles wet sand, then press firmly into the bottom of a 9-inch springform pan.
Bake at 350°F for 10 minutes to set the crust and develop its flavor.
Step 2: Prepare Eggs and Lower Oven Temperature
- 4 large eggs
While the crust bakes, place your room-temperature eggs in a bowl of warm water and let them soak for 5-7 minutes—this ensures they incorporate smoothly into the batter and helps prevent overmixing, which can trap excess air and cause cracking.
When the crust time is up, remove it from the oven and lower the temperature to 325°F.
This gentle heat is essential for a creamy, crack-free cheesecake.
Step 3: Build the Cheesecake Filling
- 32 oz cream cheese
- 1 1/2 cups granulated sugar
- 4 large eggs
- 1/2 cup sour cream
- 1 1/2 tbsp vanilla extract
- 1 tsp lemon zest
- 3 tbsp all-purpose flour
- 3/4 tsp salt
Using an electric mixer, beat the softened cream cheese with 1 1/2 cups granulated sugar on medium speed for 3-4 minutes until completely smooth and fluffy—scrape the bowl frequently to ensure no lumps remain.
Add the warm eggs one at a time, beating on low speed after each addition and scraping the bowl between additions to maintain even texture.
Add the vanilla extract and lemon zest, then gently fold in the sour cream and flour using a spatula until just combined.
I find that folding rather than beating these final ingredients helps maintain a silky texture and prevents overdeveloping gluten in the flour, which can toughen the cake.
Step 4: Bake the Cheesecake in a Water Bath
- filling from Step 3
- crust from Step 1
Pour the filling from Step 3 over the prebaked crust in the springform pan.
Set the springform pan inside a larger roasting pan, then pour about 1 inch of hot water into the roasting pan (this water bath creates steam that ensures gentle, even cooking and prevents cracks).
Bake at 325°F for 75 minutes—the cake is done when the edges are set but the center still jiggles slightly when you gently shake the pan (about a 2-inch circle in the very middle should wobble).
The residual heat will continue cooking it as it cools.
Step 5: Cool and Set the Cheesecake
Turn off the oven and crack the door open about 4 inches, leaving the cheesecake inside for 15 minutes—this gradual temperature change prevents the dramatic shock that causes cracking.
Remove the cake from the oven and water bath, then let it cool at room temperature for at least 1 hour before refrigerating.
I always let my cheesecake chill for several hours in the fridge (or overnight if possible) before finishing it, as the flavors deepen and the texture becomes perfectly creamy.
Step 6: Finish and Serve
- reserved crumbs from Step 1
- 1/2 cup strawberry syrup
- 1 1/2 cups buttercream or whipped topping
- 6-8 fresh strawberries
- 2 tbsp strawberry gelatin powder
Once the cheesecake is fully chilled, gently warm the strawberry syrup in a small saucepan and drizzle it over the top, allowing it to pool attractively.
Sprinkle the reserved crumbs from Step 1 over the syrup layer for that essential crunch.
Top with a generous dollop of buttercream or whipped topping, then arrange the halved fresh strawberries on top for a beautiful presentation.

Irresistible Strawberry Crunch Cheesecake
Ingredients
For the crust
- 24 Golden Oreo sandwich cookies
- 1/2 cup freeze-dried strawberries (crushed for better crunch)
- 2 tbsp strawberry gelatin powder
- 5 tbsp unsalted butter (melted and cooled)
- 1/4 tsp salt
For the cheesecake
- 32 oz cream cheese (softened)
- 1 1/2 cups granulated sugar
- 4 large eggs (room temperature)
- 1/2 cup sour cream (full fat)
- 1 1/2 tbsp vanilla extract
- 1 tsp lemon zest
- 3 tbsp all-purpose flour
- 3/4 tsp salt
For the topping
- 1/2 cup strawberry syrup
- 1 1/2 cups buttercream or whipped topping
- 6-8 fresh strawberries (halved for garnish)
Instructions
- Preheat your oven to 350°F. While it heats, grind the Golden Oreo cookies and crushed freeze-dried strawberries together in a food processor until you achieve a fine, sandy texture with some small chunks remaining for crunch. Transfer the mixture to a bowl and set aside 1 cup of crumbs for topping later—this gives you that signature textural contrast. Mix the remaining crumbs with melted butter, 2 tablespoons sugar, and salt until it resembles wet sand, then press firmly into the bottom of a 9-inch springform pan. Bake at 350°F for 10 minutes to set the crust and develop its flavor.
- While the crust bakes, place your room-temperature eggs in a bowl of warm water and let them soak for 5-7 minutes—this ensures they incorporate smoothly into the batter and helps prevent overmixing, which can trap excess air and cause cracking. When the crust time is up, remove it from the oven and lower the temperature to 325°F. This gentle heat is essential for a creamy, crack-free cheesecake.
- Using an electric mixer, beat the softened cream cheese with 1 1/2 cups granulated sugar on medium speed for 3-4 minutes until completely smooth and fluffy—scrape the bowl frequently to ensure no lumps remain. Add the warm eggs one at a time, beating on low speed after each addition and scraping the bowl between additions to maintain even texture. Add the vanilla extract and lemon zest, then gently fold in the sour cream and flour using a spatula until just combined. I find that folding rather than beating these final ingredients helps maintain a silky texture and prevents overdeveloping gluten in the flour, which can toughen the cake.
- Pour the filling from Step 3 over the prebaked crust in the springform pan. Set the springform pan inside a larger roasting pan, then pour about 1 inch of hot water into the roasting pan (this water bath creates steam that ensures gentle, even cooking and prevents cracks). Bake at 325°F for 75 minutes—the cake is done when the edges are set but the center still jiggles slightly when you gently shake the pan (about a 2-inch circle in the very middle should wobble). The residual heat will continue cooking it as it cools.
- Turn off the oven and crack the door open about 4 inches, leaving the cheesecake inside for 15 minutes—this gradual temperature change prevents the dramatic shock that causes cracking. Remove the cake from the oven and water bath, then let it cool at room temperature for at least 1 hour before refrigerating. I always let my cheesecake chill for several hours in the fridge (or overnight if possible) before finishing it, as the flavors deepen and the texture becomes perfectly creamy.
- Once the cheesecake is fully chilled, gently warm the strawberry syrup in a small saucepan and drizzle it over the top, allowing it to pool attractively. Sprinkle the reserved crumbs from Step 1 over the syrup layer for that essential crunch. Top with a generous dollop of buttercream or whipped topping, then arrange the halved fresh strawberries on top for a beautiful presentation.
