If you ask me, homemade fig bars are way better than anything you can buy at the store.
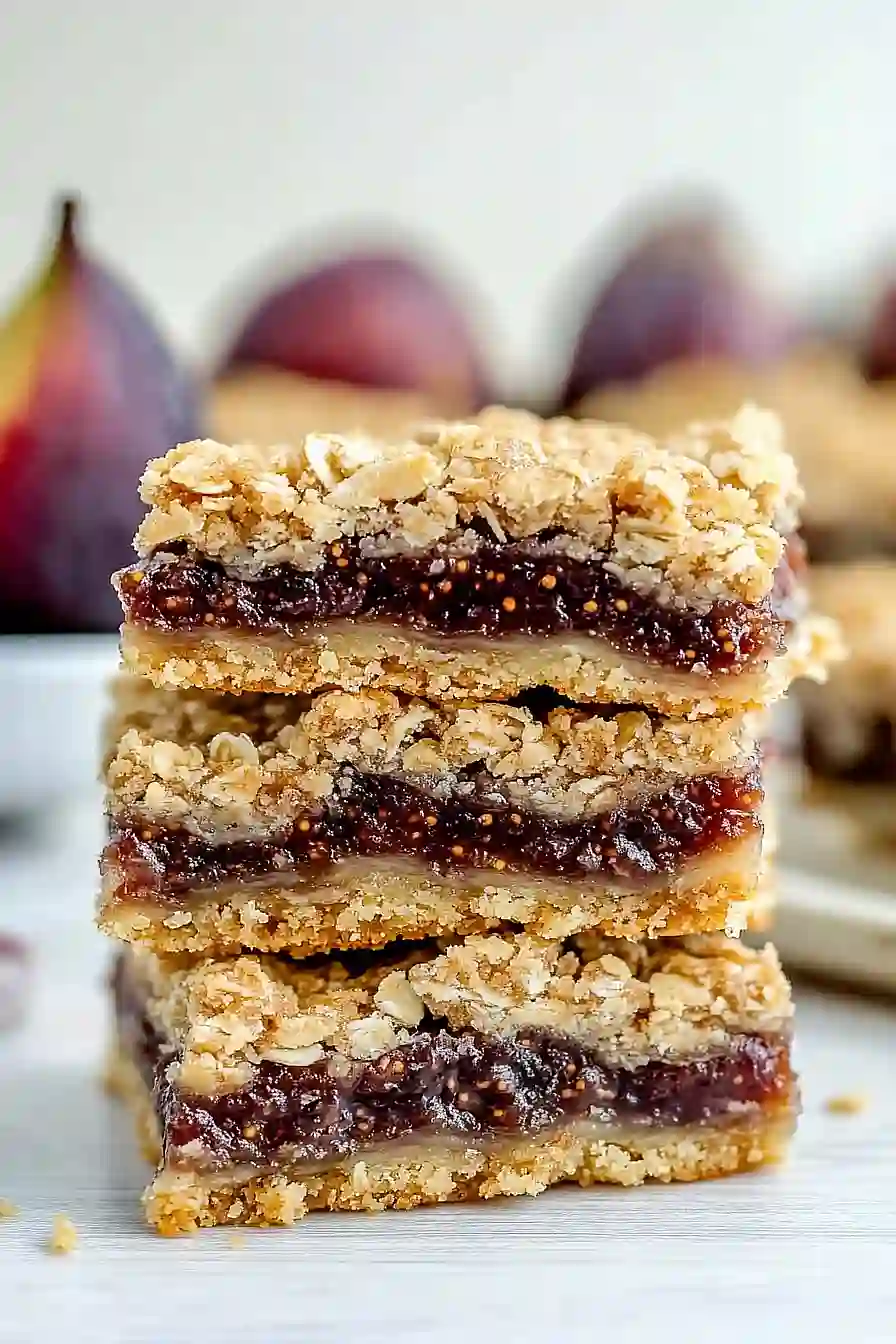
These chewy, fruity treats make a perfect snack that’s packed with sweet fig filling and wrapped in a tender oat crust. The jammy fig center pairs with warm spices like cinnamon and a hint of lemon zest.
They’re baked until golden brown and have that perfect balance of soft and slightly crumbly texture. A dusting of powdered sugar and a cup of coffee help the whole thing come together.
They’re a family-friendly treat that feels fancy but is surprisingly easy to make, perfect for lunch boxes or afternoon snacking.
Why You’ll Love These Fig Bars
- Fresh fig filling – Using fresh figs instead of processed filling gives these bars a natural sweetness and amazing texture that store-bought versions just can’t match.
- Simple pantry ingredients – Most of what you need is probably already in your kitchen – just butter, flour, oats, and brown sugar for the base.
- Perfect make-ahead treat – These bars actually taste better the next day once the flavors have had time to meld together, making them great for meal prep or entertaining.
- Healthier than store-bought – You control exactly what goes into these bars – no preservatives or artificial ingredients, just real food that tastes amazing.
- Great for any occasion – Whether you need a lunchbox snack, dessert for company, or something special for a bake sale, these fig bars fit the bill perfectly.
What Kind of Figs Should I Use?
Fresh figs are the star of these bars, and you have some good options to choose from. Black Mission figs and Brown Turkey figs are probably the most common varieties you’ll find at the grocery store, and both work great for baking since they hold their shape well and have a nice sweet flavor. If you can find them, Calimyrna figs are another excellent choice with their slightly nutty taste. The key is making sure your figs are ripe but still firm – they should give slightly when you press them but not be mushy. Avoid any figs that are overly soft or have splits in the skin, as these can make your bars too wet.

Options for Substitutions
These fig bars are pretty adaptable, so here are some swaps you can make if needed:
- Fresh figs: If fresh figs aren’t available, you can use dried figs instead. Soak about 2 cups of dried figs in warm water for 15 minutes to soften them before chopping. You can also try other fruits like dates, dried apricots, or even fresh pears for a different twist.
- Old fashioned rolled oats: Quick oats will work in a pinch, but your bars might have a slightly different texture – less chewy and more tender. Avoid instant oats as they’ll get too mushy.
- All-purpose flour: You can substitute with whole wheat flour for a nuttier flavor, but use about 1¾ cups instead since whole wheat flour is denser. For gluten-free options, try a 1:1 gluten-free flour blend.
- Butter: Coconut oil (melted) or vegetable oil can replace the butter, though you’ll lose some of that rich, buttery flavor. Use the same amount as called for.
- Brown sugar: White sugar works fine, though you’ll miss the molasses flavor. You can also try coconut sugar or maple syrup (reduce by about 2 tablespoons if using syrup).
- Lemon zest: Orange zest makes a nice substitute, or you can skip the citrus altogether if you don’t have any on hand.
Watch Out for These Mistakes While Baking
The biggest mistake when making fig bars is not cooking the fig filling long enough, which leads to a watery mess that seeps through your crust – make sure to simmer the quartered figs until most of the liquid has evaporated and the mixture is thick and jammy.
Another common error is pressing the bottom crust too firmly into the pan, creating a rock-hard base that’s difficult to cut through, so just gently pat it down to create an even layer.
Don’t skip letting the bars cool completely before cutting, as warm fig bars will crumble and fall apart no matter how perfectly you’ve baked them – patience here really pays off.
For cleaner cuts and professional-looking bars, run your knife under warm water and wipe it clean between each slice, and consider lining your pan with parchment paper for easy removal.

What to Serve With Fig Bars?
These fig bars are perfect with a hot cup of coffee or tea – the rich, fruity sweetness pairs beautifully with both. I love serving them as an afternoon snack alongside some vanilla Greek yogurt for a little extra creaminess, or you can crumble them over ice cream for a simple dessert. They also make a great addition to a cheese board with some soft goat cheese or brie, since figs and cheese are such a natural combination. For breakfast or brunch, try them with a glass of cold milk or even warmed up slightly with a pat of butter.
Storage Instructions
Keep Fresh: These fig bars taste amazing for days after baking! Store them in an airtight container at room temperature for up to a week, or pop them in the fridge if your kitchen gets warm. I like to cut parchment paper to fit between layers so they don’t stick together.
Freeze: Fig bars are perfect for freezing when you want to make them ahead for parties or just have a sweet treat ready to go. Wrap individual bars in plastic wrap or store them in a freezer-safe container for up to 3 months. They thaw beautifully at room temperature in about 30 minutes.
Make Ahead: You can actually prepare the fig filling a day or two ahead and keep it covered in the fridge. The flavors get even better with time! Just assemble and bake when you’re ready, though I’d recommend baking them the same day you plan to serve for the best texture.
| Preparation Time | 30-45 minutes |
| Cooking Time | 30-35 minutes |
| Total Time | 60-80 minutes |
| Level of Difficulty | Medium |
Estimated Nutrition
Estimated nutrition for the whole recipe (without optional ingredients):
- Calories: 4300-4700
- Protein: 40-50 g
- Fat: 180-210 g
- Carbohydrates: 640-690 g
Ingredients
For the fig filling:
- 1 1/2 tbsp lemon zest (freshly grated for bright flavor)
- 1 tsp vanilla extract (I use Madagascar vanilla)
- 1/4 cup brown sugar
- 1/4 tsp salt
- 26 figs (fresh, about 1 3/4 lbs, stemmed)
For the crust and crumb topping:
- 3/4 tsp baking powder
- 1 1/4 cups butter (softened to room temperature)
- 1/2 tsp salt
- 2 cups all-purpose flour (I use King Arthur)
- 2 cups old-fashioned oats
- 2 tsp vanilla extract
- 1 cup brown sugar (packed)
Step 1: Prepare the Fig Filling
- 26 figs
- 1/4 cup brown sugar
- 1 1/2 tbsp lemon zest
- 1/4 tsp salt
- 1 tsp vanilla extract
Combine the stemmed figs, 1/4 cup brown sugar, lemon zest, 1/4 tsp salt, and 1 tsp vanilla extract in a medium saucepan.
Bring the mixture to a boil over medium-high heat, then reduce to a simmer and cook for 45 minutes, stirring occasionally to prevent sticking and ensure even cooking.
The mixture will darken and become jam-like as the figs break down and release their natural juices.
Once the filling is thick and spreadable, remove it from heat and let it cool to room temperature—this usually takes about 20-30 minutes.
I like to use fresh lemon zest here rather than bottled, as it gives the filling a much brighter, more vibrant flavor that really complements the sweetness of the figs.
Step 2: Prepare the Pan and Preheat Oven
While the fig filling is cooking, preheat your oven to 350°F (175°C).
Line a 9×13-inch baking pan with foil, allowing the foil to hang over the edges slightly for easy removal.
Lightly spray the foil with cooking spray to prevent the bars from sticking.
This setup makes it much easier to lift the entire batch of bars out of the pan once cooled, giving you clean edges.
Step 3: Make the Oat Crust and Topping Base
- 1 1/4 cups butter
- 2 cups all-purpose flour
- 2 cups old-fashioned oats
- 1 cup brown sugar
- 1/2 tsp salt
- 3/4 tsp baking powder
- 2 tsp vanilla extract
Melt the softened butter in a large bowl (it should be soft enough to melt easily at room temperature or you can gently warm it).
Add the flour, oats, 1 cup packed brown sugar, 1/2 tsp salt, baking powder, and 2 tsp vanilla extract to the melted butter.
Mix everything together with a wooden spoon or your hands until the mixture is evenly combined and resembles coarse breadcrumbs with some slightly larger clumps—this texture is important for getting a nice, crumbly topping.
I find using my hands is fastest here; just squeeze and mix until everything is incorporated and the mixture holds together slightly when pressed.
Step 4: Layer the Crust, Filling, and Topping
- oat mixture from Step 3
- fig filling from Step 1
Reserve 1 1/2 cups of the oat mixture from Step 3 in a separate bowl for the topping.
Press the remaining oat mixture firmly and evenly into the prepared pan, creating an even base layer about 1/4 inch thick—use the bottom of a measuring cup to help press it down smoothly.
Spread the cooled fig filling from Step 1 evenly over the oat crust, leaving a thin border around the edges.
Finally, crumble the reserved 1 1/2 cups of oat topping evenly over the fig filling, breaking it into bite-sized pieces as you go.
Step 5: Bake and Cool the Bars
Bake in your preheated 350°F oven for 30-35 minutes, until the oat topping turns light golden brown and the edges are slightly darker.
The bars will continue to set as they cool, so don’t overbake or they’ll become too crispy.
Remove from the oven and let the bars cool completely in the pan at room temperature, about 1-2 hours.
This cooling time is crucial—it allows the fig filling to set properly so the bars hold together cleanly when cut.
Once fully cooled, you can lift the foil edges to remove the entire slab from the pan, then cut into squares.

This looks so good! What a great combination of flavors!
Thanks for sharing! Does it keep long?
The flavor is great after adding cinnamon, cloves and nutmeg. My trouble is the crumbly topping isn’t so crumbly but more of a blobbed look which doesn’t completely cover the filling. Would cooling the topping make it easier to crumble? Or perhaps adding a little more oatmeal would help. I’ll try both on my next round. Thank you for sharing your recipe.