Here is my go-to apple pie recipe, with a simple, foolproof, buttery, tender homemade crust, and a sweet filling loaded with fresh apples, warm spices, vanilla, and just a hint of lemon juice.
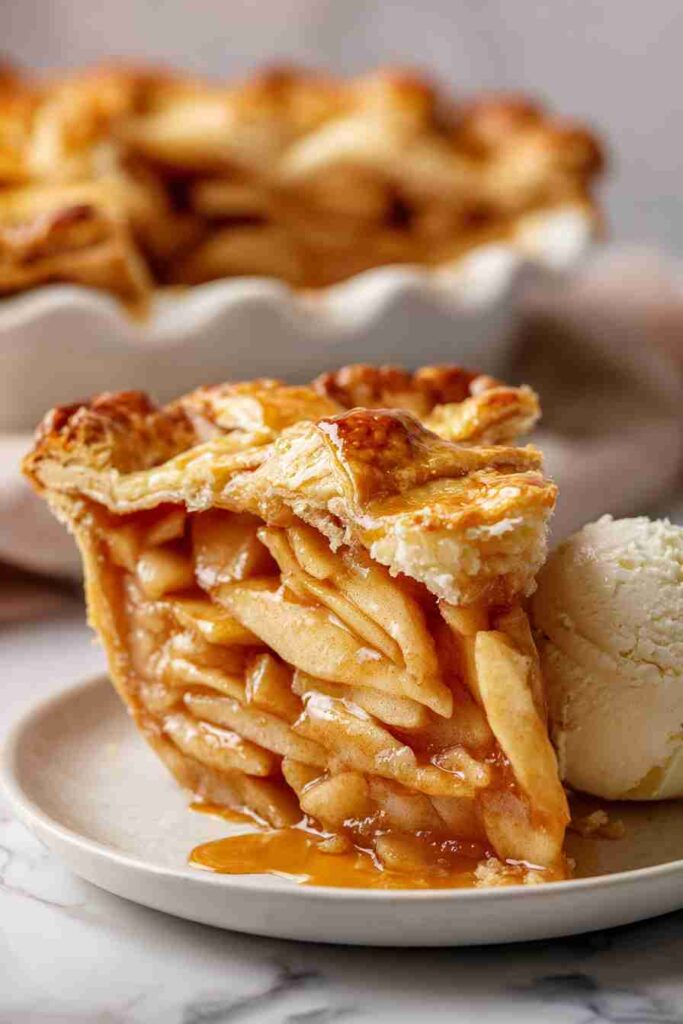
This apple pie has become our family’s favorite dessert for fall gatherings and holiday dinners. I always end up making an extra one because it disappears so quickly. There’s nothing quite like a slice of homemade apple pie with a scoop of vanilla ice cream, am I right?
Why You’ll Love This Apple Pie
- Classic homemade comfort – Nothing beats the smell of apple pie baking in your oven, and this recipe delivers that perfect balance of tender apples and flaky crust that makes everyone feel at home.
- Perfect spice blend – The combination of cinnamon, nutmeg, and optional cardamom creates a warm, cozy flavor that makes each bite taste like fall in your mouth.
- Great for any occasion – Whether it’s Thanksgiving dinner, a weekend family gathering, or just because you’re craving something sweet, this pie always hits the spot.
- Impressive but doable – While it looks fancy enough for special occasions, the step-by-step process is totally manageable, even if you’re not an experienced baker.
- Amazing leftovers – If there’s any left over, it tastes just as good the next day with your morning coffee or warmed up with a scoop of vanilla ice cream.
What Kind of Apples Should I Use?
For apple pie, you’ll want to stick with apples that hold their shape well during baking and won’t turn to mush. Good choices include Granny Smith, Honeycrisp, Braeburn, or Jonathan apples – these varieties have the right balance of tartness and firmness. You can also mix different types of apples for more complex flavor, like combining tart Granny Smiths with sweeter Honeycrisps. Avoid softer apples like Red Delicious or Gala, as they tend to break down too much during the long baking time and can make your pie filling watery.
Options for Substitutions
This classic apple pie recipe has room for some tweaks and swaps if you need them:
- Pie crust: If making homemade crust feels overwhelming, store-bought works perfectly fine. You can also try a graham cracker crust for a different twist, though it won’t have that traditional flaky texture.
- Apples: Mix and match apple varieties for the best flavor – try combining tart Granny Smiths with sweet Honeycrisps or Galas. Avoid Red Delicious as they get too mushy when baked.
- Brown sugar and granulated sugar: You can use all brown sugar for a deeper molasses flavor, or swap some of the sugar for maple syrup (reduce by about 2 tablespoons and add an extra tablespoon of flour).
- Spices: No cardamom? Skip it or try a pinch of ginger instead. You can also use apple pie spice (about 2 teaspoons) in place of the individual spices.
- All purpose flour: Cornstarch works as a thickener too – use about 3 tablespoons instead of the 5 tablespoons of flour. Tapioca starch is another good option.
- Lemon juice and zest: Apple cider vinegar can substitute for lemon juice to prevent browning, though you’ll miss that bright citrus note. The zest can be skipped if you don’t have fresh lemons.
Watch Out for These Mistakes While Baking
The biggest mistake when making apple pie is using apples that turn to mush during baking – stick with firm varieties like Granny Smith, Honeycrisp, or Braeburn that hold their shape and won’t leave you with apple sauce in a crust.
Another common error is skipping the pre-cooking step for your apples, which can lead to a gap between the filling and top crust as the apples shrink during baking – try sautéing your seasoned apple mixture for 5-7 minutes before filling the pie.
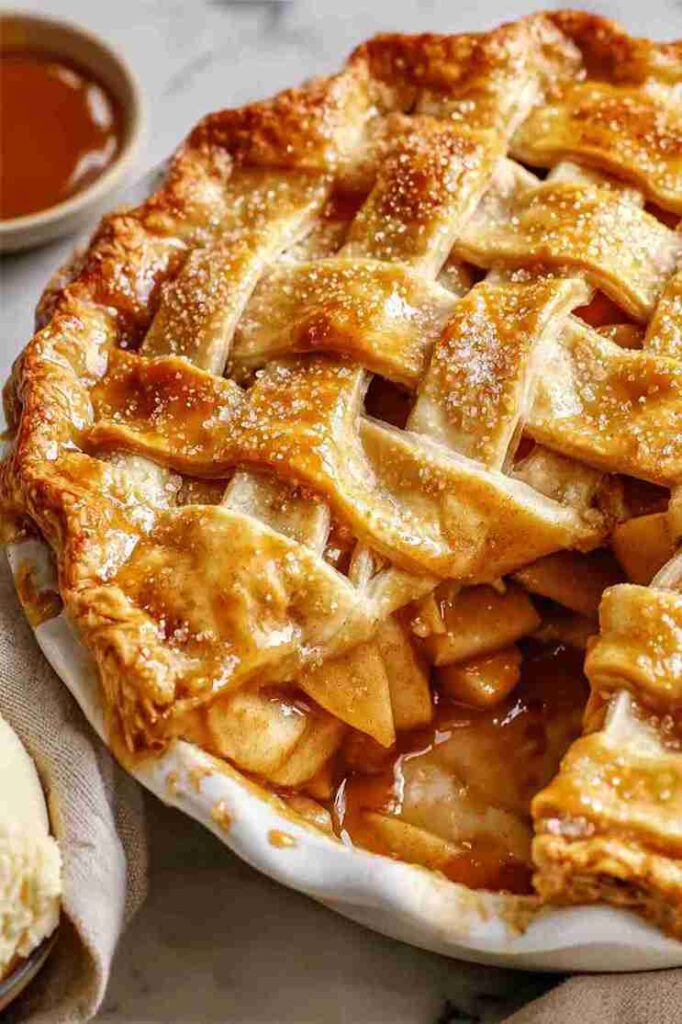
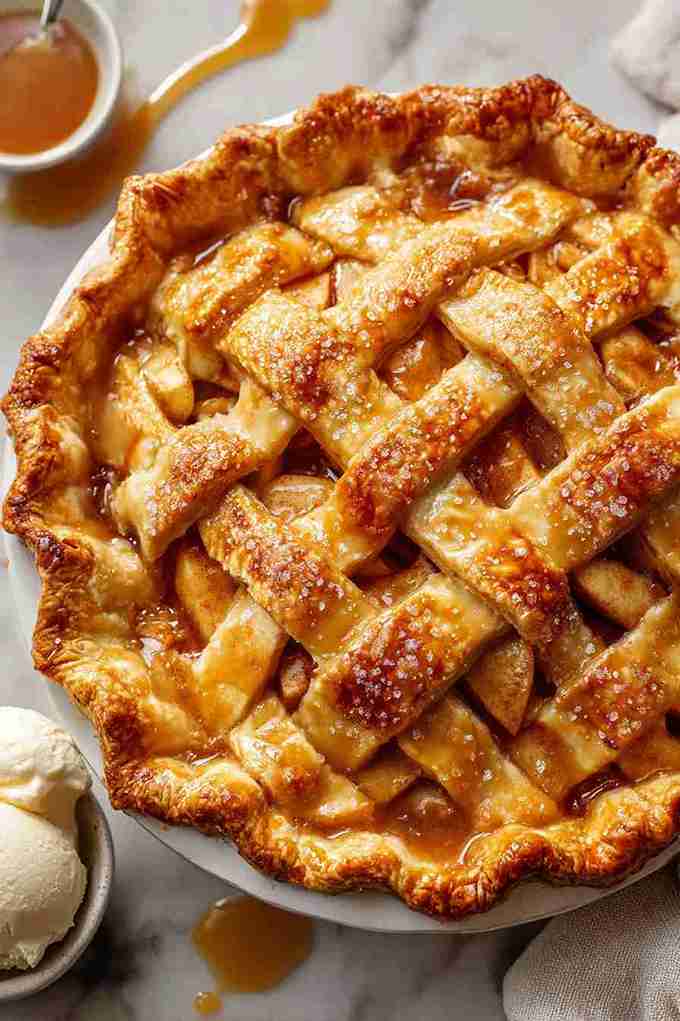
Don’t forget to cut several vents in your top crust to allow steam to escape, and if the edges start browning too quickly, cover them with foil strips halfway through baking.
Finally, resist the urge to slice into your pie right away – letting it cool for at least 2 hours allows the filling to set properly so you get clean, beautiful slices instead of a runny mess.
What to Serve With Apple Pie?
Apple pie is amazing on its own, but a scoop of vanilla ice cream on top really takes it to the next level – the cold, creamy ice cream melting into the warm, spiced apples is pure magic. If you want to get fancy, try serving it with some freshly whipped cream or even a drizzle of caramel sauce for extra sweetness. A hot cup of coffee or black tea pairs beautifully with the warm spices like cinnamon and nutmeg in the pie. For a cozy fall evening, I love serving apple pie alongside some sharp cheddar cheese – it might sound weird, but the tangy cheese really complements the sweet apples perfectly.
Storage Instructions
Keep Fresh: Your apple pie will stay delicious at room temperature for up to 2 days – just cover it loosely with foil or plastic wrap. After that, pop it in the fridge where it’ll keep for up to a week. I actually think apple pie tastes even better the next day when all those spices have had time to meld together!
Freeze: Apple pie freezes wonderfully for up to 4 months. You can freeze it whole (wrapped tightly in plastic wrap and foil) or cut it into individual slices first. I love having slices ready to go in the freezer for when I need a quick dessert fix!
Warm Up: To bring back that fresh-baked taste, warm individual slices in the microwave for 30-45 seconds, or heat the whole pie in a 350°F oven for about 15-20 minutes. If it’s frozen, let it thaw in the fridge overnight first, then warm it up. A scoop of vanilla ice cream never hurts either!
| Preparation Time | 30-60 minutes |
| Cooking Time | 55-70 minutes |
| Total Time | 85-130 minutes |
| Level of Difficulty | Medium |
Estimated Nutrition
Estimated nutrition for the whole recipe (without optional ingredients):
- Calories: 3000-3400
- Protein: 25-30 g
- Fat: 90-110 g
- Carbohydrates: 570-630 g
Ingredients
For the pastry crust:
- 1 homemade double crust (2 sheets pie dough)
For the apple filling:
- 5 lb apples (weight before peeling and coring)
- 1/4 tsp grated lemon peel
- 2 tbsp fresh lemon juice
- 3/4 cup packed brown sugar
- 3/4 cup white sugar
- 5 tbsp all-purpose flour
- 1/4 tsp kosher salt
- 1 1/2 tsp ground cinnamon
- 3/4 tsp ground nutmeg
- 1/2 tsp ground cardamom (optional)
- 1 tsp vanilla extract
For the pie topping:
- 1 tbsp milk (for brushing crust)
- 1 tbsp beaten egg (optional, for brushing)
- 1 tbsp turbinado sugar (or raw sugar, for sprinkling)
Step 1: Prepare and Pre-Cook the Apple Filling
- 5 lb apples (weight before peeling and coring)
- 1/4 tsp grated lemon peel
- 2 tbsp fresh lemon juice
- 3/4 cup packed brown sugar
- 3/4 cup white sugar
- 5 tbsp all-purpose flour
- 1/4 tsp kosher salt
- 1 1/2 tsp ground cinnamon
- 3/4 tsp ground nutmeg
- 1/2 tsp ground cardamom (optional)
- 1 tsp vanilla extract
Start by zesting 1/4 teaspoon of lemon peel into a large, high-sided skillet.
Squeeze 2 tablespoons of fresh lemon juice into the skillet as well.
Peel, core, and thinly slice your 5 pounds of apples, working one apple at a time to prevent browning.
Add each apple slice to the skillet and toss occasionally to coat with the lemon juice.
Once all apples are sliced and in the skillet, place the skillet over medium heat.
Add the brown sugar, granulated sugar, flour, kosher salt, cinnamon, nutmeg, and cardamom (if using).
Stir gently to avoid breaking up the apple slices, and cook covered for about 20 minutes, stirring every 3 minutes to prevent sticking.
The apples should be fork tender but still hold their shape; add water by the tablespoon if they stick.
When done, remove from heat and stir in the vanilla extract.
Step 2: Cool the Apple Filling
- apple filling (from Step 1)
Transfer the cooked apple filling, including all the delicious syrupy juices, to a rimmed sheet pan or any pan with a lip.
Spread the apples evenly to help them cool quickly.
Place the pan in the refrigerator or freezer and chill the filling completely, for about 30 minutes.
Letting the filling cool like this helps prevent a soggy bottom crust when you assemble your pie.
If you’re not in a hurry, you can also let it cool at room temperature for a couple of hours.
Step 3: Roll Out and Fill the Pie Crust
- 1 homemade double crust (2 sheets pie dough)
- chilled apple filling (from Step 2)
Roll out one sheet of your homemade pie dough and line a deep 9-inch pie dish, leaving some excess dough hanging over the edges.
Pour all of the chilled apple filling from Step 2 into the prepared crust, scraping out every bit of the gooey filling.
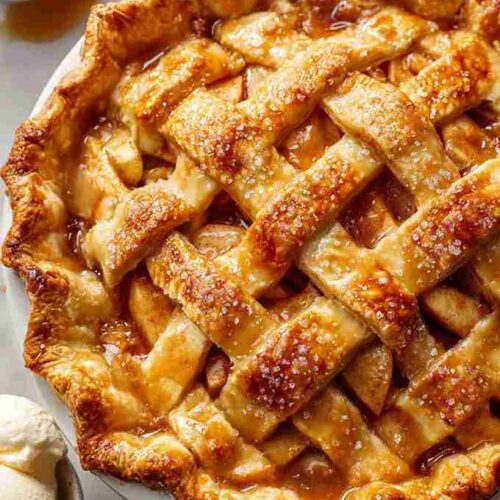
Top the filling with the second sheet of pie dough, making a lattice crust or laying the sheet as a whole.
Fold the edges under and crimp as you like.
If you’re using a whole top crust, remember to cut vents to allow steam to escape.
For an extra flaky crust, chill the assembled pie in the fridge or freezer for 20-30 minutes before baking.
I find this step always makes for a better, flakier pie!
Step 4: Brush and Sprinkle the Crust
- 1 tbsp milk (for brushing crust)
- 1 tbsp beaten egg (optional, for brushing)
- 1 tbsp turbinado sugar (or raw sugar, for sprinkling)
Just before you bake, brush the top crust with 1 tablespoon of milk, 1 tablespoon of beaten egg, or both mixed together for a golden brown and glossy finish.
Sprinkle turbinado sugar or regular sugar generously over the crust for a sweet, crunchy texture.
Step 5: Bake the Pie
- pie from Step 4
Place a baking sheet on the center rack of your oven and preheat to 425°F (218°C) for at least 20-25 minutes to ensure it’s hot.
Place the chilled pie from Step 3 onto the baking sheet and bake for 15 minutes, until the edges of the crust start to turn light brown.
While baking, prepare a square of tin foil with a circle cut in the center to protect the pie edges from burning.
Reduce the oven temperature to 350°F (177°C), remove the pie, and carefully place the foil shield over the edges.
Return the pie to the oven and continue baking for 40-45 more minutes, until the crust is golden and the filling is bubbling.
I like to peek through the lattice and watch for bubbling juices – that’s the best sign it’s ready!
Step 6: Cool and Serve
Let the baked pie cool completely on a wire rack, about 4 hours.
This is an important step to allow the filling to set and makes for cleaner slices.
Once cool, slice and serve—it’s especially delicious with a scoop of vanilla ice cream, and I often drizzle a little caramel sauce on top for a decadent touch!
Flaky Apple Pie
Ingredients
For the pastry crust:
- 1 homemade double crust (2 sheets pie dough)
For the apple filling:
- 5 lb apples (weight before peeling and coring)
- 1/4 tsp grated lemon peel
- 2 tbsp fresh lemon juice
- 3/4 cup packed brown sugar
- 3/4 cup white sugar
- 5 tbsp all-purpose flour
- 1/4 tsp kosher salt
- 1 1/2 tsp ground cinnamon
- 3/4 tsp ground nutmeg
- 1/2 tsp ground cardamom (optional)
- 1 tsp vanilla extract
For the pie topping:
- 1 tbsp milk (for brushing crust)
- 1 tbsp beaten egg (optional, for brushing)
- 1 tbsp turbinado sugar (or raw sugar, for sprinkling)
Instructions
- Start by zesting 1/4 teaspoon of lemon peel into a large, high-sided skillet. Squeeze 2 tablespoons of fresh lemon juice into the skillet as well. Peel, core, and thinly slice your 5 pounds of apples, working one apple at a time to prevent browning. Add each apple slice to the skillet and toss occasionally to coat with the lemon juice. Once all apples are sliced and in the skillet, place the skillet over medium heat. Add the brown sugar, granulated sugar, flour, kosher salt, cinnamon, nutmeg, and cardamom (if using). Stir gently to avoid breaking up the apple slices, and cook covered for about 20 minutes, stirring every 3 minutes to prevent sticking. The apples should be fork tender but still hold their shape; add water by the tablespoon if they stick. When done, remove from heat and stir in the vanilla extract.
- Transfer the cooked apple filling, including all the delicious syrupy juices, to a rimmed sheet pan or any pan with a lip. Spread the apples evenly to help them cool quickly. Place the pan in the refrigerator or freezer and chill the filling completely, for about 30 minutes. Letting the filling cool like this helps prevent a soggy bottom crust when you assemble your pie. If you’re not in a hurry, you can also let it cool at room temperature for a couple of hours.
- Roll out one sheet of your homemade pie dough and line a deep 9-inch pie dish, leaving some excess dough hanging over the edges. Pour all of the chilled apple filling from Step 2 into the prepared crust, scraping out every bit of the gooey filling. Top the filling with the second sheet of pie dough, making a lattice crust or laying the sheet as a whole. Fold the edges under and crimp as you like. If you’re using a whole top crust, remember to cut vents to allow steam to escape. For an extra flaky crust, chill the assembled pie in the fridge or freezer for 20-30 minutes before baking. I find this step always makes for a better, flakier pie!
- Just before you bake, brush the top crust with 1 tablespoon of milk, 1 tablespoon of beaten egg, or both mixed together for a golden brown and glossy finish. Sprinkle turbinado sugar or regular sugar generously over the crust for a sweet, crunchy texture.
- Place a baking sheet on the center rack of your oven and preheat to 425°F (218°C) for at least 20-25 minutes to ensure it’s hot. Place the chilled pie from Step 3 onto the baking sheet and bake for 15 minutes, until the edges of the crust start to turn light brown. While baking, prepare a square of tin foil with a circle cut in the center to protect the pie edges from burning. Reduce the oven temperature to 350°F (177°C), remove the pie, and carefully place the foil shield over the edges. Return the pie to the oven and continue baking for 40-45 more minutes, until the crust is golden and the filling is bubbling. I like to peek through the lattice and watch for bubbling juices – that’s the best sign it’s ready!
- Let the baked pie cool completely on a wire rack, about 4 hours. This is an important step to allow the filling to set and makes for cleaner slices. Once cool, slice and serve—it’s especially delicious with a scoop of vanilla ice cream, and I often drizzle a little caramel sauce on top for a decadent touch!

Do I need to butter the pie dish before I lay my crust down??