Deciding what to make for a bake sale or cookie exchange can feel like a real head-scratcher. You want something that stands out from the usual chocolate chip cookies, but not so complicated that you spend hours in the kitchen – especially when you’re juggling work deadlines or trying to help with homework at the same time.
That’s where these M&M brookies come in: they’re the perfect mix of brownies and cookies rolled into one treat, super easy to whip up, and always a hit with both kids and grown-ups. Plus, you can switch up the candies based on whatever holiday or season you’re baking for.
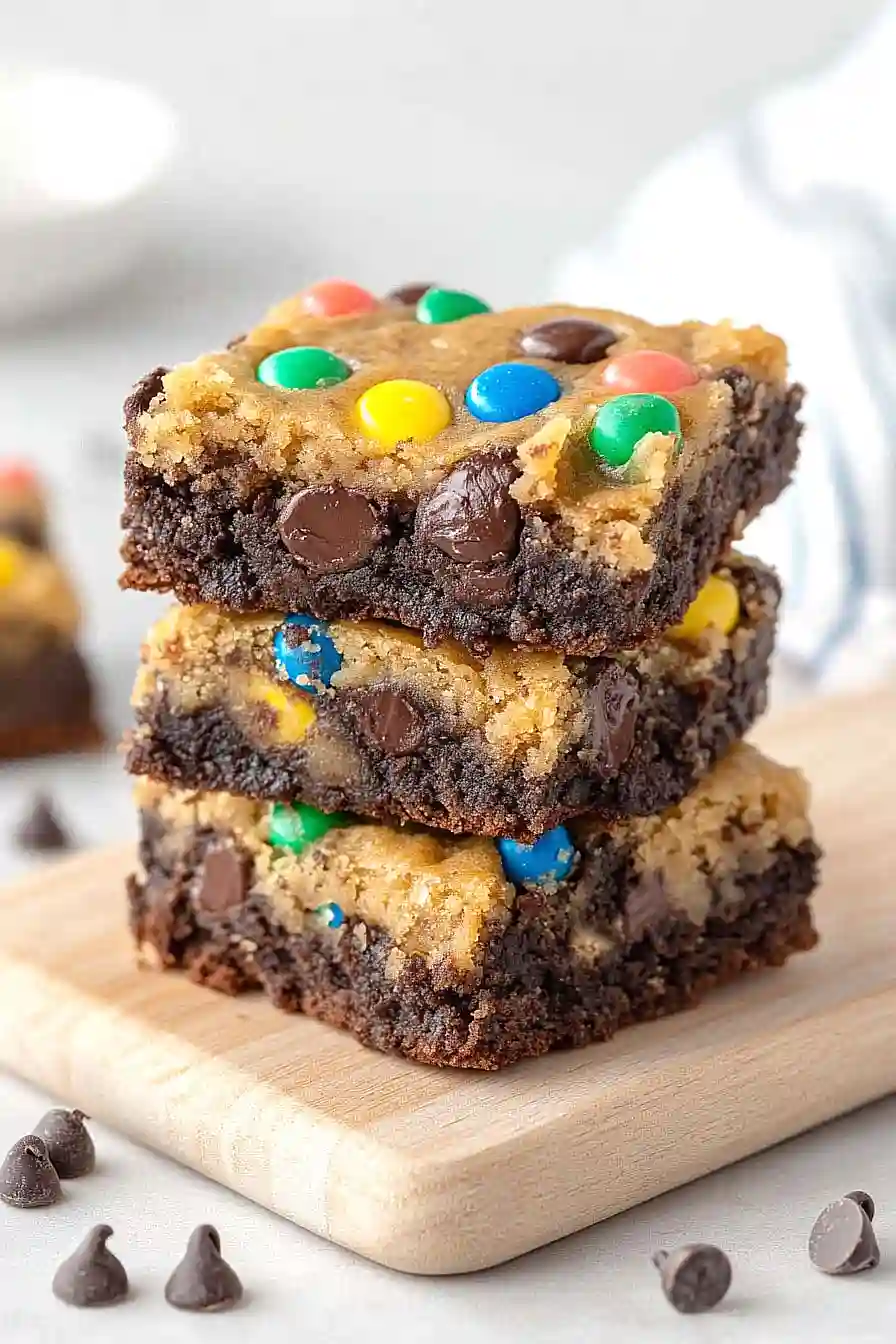
Why You’ll Love These Brookies
- Two desserts in one – Get the best of both worlds with fudgy brownies and chewy cookies combined into one amazing treat – no need to choose between your favorites!
- Perfect for chocolate lovers – With three different types of chocolate plus M&Ms, these brookies deliver an intense chocolate experience that will satisfy any sweet tooth.
- Make-ahead friendly – These brookies stay fresh for several days when stored properly, making them perfect for bake sales, parties, or weekend meal prep.
- Customizable recipe – You can easily swap out the M&Ms for your favorite candy, or use different chocolate chips to create your own perfect combination.
- Crowd-pleasing dessert – These treats are always a hit at parties and gatherings – kids love the candy topping while adults appreciate the rich chocolate layers.
What Kind of Chocolate Should I Use?
For brookies, you’ll want to pay attention to the different types of chocolate since this recipe calls for several varieties. Dark cocoa powder forms the base of the brownie layer – Dutch-processed cocoa works great here since it gives a deeper chocolate flavor than natural cocoa powder. For the chocolate bits and chips, you can stick with standard baking chips from the grocery store, but using chopped premium chocolate bars will melt better and give you a more complex flavor. When it comes to the M&Ms, regular-sized ones can make the cookies a bit bulky, so mini M&Ms are perfect since they distribute more evenly throughout the dough and make each bite more balanced.

Options for Substitutions
This brookie recipe can be adapted with several ingredient swaps if needed:
- Dark chocolate cocoa: Regular unsweetened cocoa powder works fine here, though the color won’t be as deep. Dutch-process cocoa is another good option that will give you similar rich results.
- Chocolate bits and morsels: Feel free to mix and match any chocolate chips you have – milk, dark, or semi-sweet all work well. You can even use chopped chocolate bars instead of chips.
- M&Ms: Any small chocolate candies work great here – try Reese’s Pieces, chopped Snickers, or even chocolate-covered nuts. Just keep the amount the same.
- Peanut butter: You can swap in almond butter or cookie butter, though peanut butter gives the best flavor. If using natural peanut butter, make sure it’s well-stirred.
- Brown sugar: Out of brown sugar? Mix 1 cup white sugar with 1 tablespoon molasses for each cup of brown sugar needed. Dark brown sugar works too, but will give a stronger molasses taste.
- Flaky salt: Regular kosher salt works in a pinch, though flaky salt gives that nice crunch. You can also skip it if you prefer.
Watch Out for These Mistakes While Baking
The biggest challenge when making brookies is achieving the right texture for both the brownie and cookie layers – overmixing either batter will lead to tough, dense results instead of that perfect fudgy-meets-chewy texture. When melting chocolate and butter for the brownie layer, be careful not to overheat as this can cause the chocolate to seize and become grainy – use a double boiler or microwave in short bursts, stirring frequently. For the cookie layer, room temperature ingredients are crucial – cold butter and eggs won’t cream properly, affecting the final texture, so plan ahead and let them sit out for at least an hour before starting. To prevent the layers from baking unevenly, make sure both batters are spread in even layers and watch your oven temperature carefully – too hot and you’ll end up with overcooked edges and an undercooked center.

What to Serve With Brookies?
These chocolate-packed brookies (that awesome brownie-cookie combo!) are perfect with a cold glass of milk – whether it’s regular, almond, or oat milk, you really can’t go wrong. If you’re serving these as dessert after dinner, try pairing them with some vanilla ice cream while they’re still a bit warm – the ice cream gets all melty and creates an amazing sauce. For a coffee shop vibe at home, serve your brookies alongside a hot cup of coffee or cappuccino, which helps balance out all that chocolate sweetness. And if you’re feeling extra fancy, add a dollop of whipped cream or a drizzle of caramel sauce on top!
Storage Instructions
Keep Fresh: These M&M brookies stay nice and chewy when kept in an airtight container at room temperature for up to 5 days. I like to place a piece of bread in the container – it helps keep the brookies soft and prevents them from drying out. Just make sure they’re completely cool before storing!
Freeze: These treats are perfect for freezing! Place them in a freezer-safe container with parchment paper between layers and they’ll keep for up to 3 months. I often make a double batch just to have some ready in the freezer for unexpected guests or late-night cravings.
Thaw & Serve: When you’re craving a frozen brookie, just take out what you need and let them thaw at room temperature for about 1-2 hours. If you want that fresh-baked taste, pop them in the microwave for 10-15 seconds – the chocolate gets slightly melty and they taste almost like they just came out of the oven!
| Preparation Time | 20-30 minutes |
| Cooking Time | 45-60 minutes |
| Total Time | 65-90 minutes |
| Level of Difficulty | Medium |
Estimated Nutrition
Estimated nutrition for the whole recipe (without optional ingredients):
- Calories: 4000-4500
- Protein: 50-60 g
- Fat: 250-280 g
- Carbohydrates: 450-500 g
Ingredients
- 1 1/2 cups (180g) all-purpose flour
- 3/4 cup (88.5g) high-quality dark chocolate cocoa
- 1 teaspoon (6g) salt
- 1 cup (226g) unsalted butter
- 1 cup (180g) bittersweet chocolate bits
- 2 cups (440g) packed light brown sugar
- 4 eggs
- 2 teaspoons (8.4g) vanilla essence
- 1 cup (180g) semi-sweet chocolate morsels
- 3/4 cup (169.5g) unsalted butter, softened
- 1/2 cup (100g) white sugar
- 1/2 cup (110g) packed brown sugar
- 1 egg, room temperature
- 1/2 teaspoon (2.1g) vanilla essence
- 1 3/4 cups (210g) all-purpose flour
- 1 teaspoon (4g) baking soda
- 1 teaspoon (6g) salt
- 1 cup (180g) dark or semi-sweet chocolate chips
- 1 cup (250g) peanut butter, melted
- 1/2 cup (112g) mini chocolate candies like m&ms
- Flaky salt
Step 1: Prepare the Baking Dish
Preheat your oven to 350°F (175°C).
Spray a 9″ x 13″ baking dish with nonstick spray.
Line the bottom and sides with parchment paper, then spray the parchment again.
Set aside for later use.
Step 2: Mix the Dry Ingredients
In a medium-sized mixing bowl, whisk together the flour, cocoa powder, and salt.
Once combined, set this mixture aside.
Step 3: Make the Brownie Batter
In a medium-sized saucepan, melt the butter and bittersweet chocolate chips together over low heat until smooth.
Remove the mixture from heat and allow it to cool for about 5 minutes.
Stir in the brown sugar until smooth.
Add the eggs, one at a time, stirring well between each addition.
Mix in the vanilla.
Afterwards, incorporate the flour mixture into the wet ingredients and stir until no streaks of flour remain.
Gently fold in 1 cup of semi-sweet chocolate chips.
Step 4: Bake the Brownies
Pour the brownie batter into the prepared baking dish.
Bake in the preheated oven for 15 minutes.
Step 5: Layer and Continue Baking
After 15 minutes, remove the pan from the oven.
Pour the melted peanut butter over the partially baked brownies and gently spread it into an even layer.
Break apart the prepared cookie dough with your hands and drop it in chunks over the peanut butter layer.
Evenly sprinkle mini M&Ms over the top.
Return the dish to the oven and bake for an additional 30 minutes.
The cookie layer will turn golden brown, so don’t be alarmed.
The centers will remain gooey for a delightful texture.
Step 6: Finish and Cool
Remove the pan from the oven and sprinkle a bit of salt over the top.
Allow the bars to cool in the pan for at least an hour before serving.
If a firmer center is preferred, let the bars cool for an additional hour or two.
Step 7: Prepare the Cookie Dough (While Baking the Brownies)
Using an electric mixer fitted with the paddle attachment, beat the butter until smooth.
Add the sugars and beat until light and fluffy, about 2 minutes, making sure to scrape down the sides of the bowl as needed.
Mix in the egg until well incorporated, then add the vanilla and mix for about 30 seconds.
With the mixer on low speed, add the flour, baking soda, and salt.
Mix until just combined, then stir in the chocolate chips.
Your cookie dough is now ready to be used in Step 5.
