Finding the perfect dessert for parties and gatherings can feel like an uphill battle. After all, you want something that looks impressive but won’t leave you stressed in the kitchen for hours, and things get even trickier when you’re dealing with different dietary preferences and portion sizes.
Luckily, these lemon cheesecake mini cups check all the boxes: they’re creamy and tangy, easy to make ahead of time, and portion-controlled so everyone gets their own little treat without any messy cutting or serving.
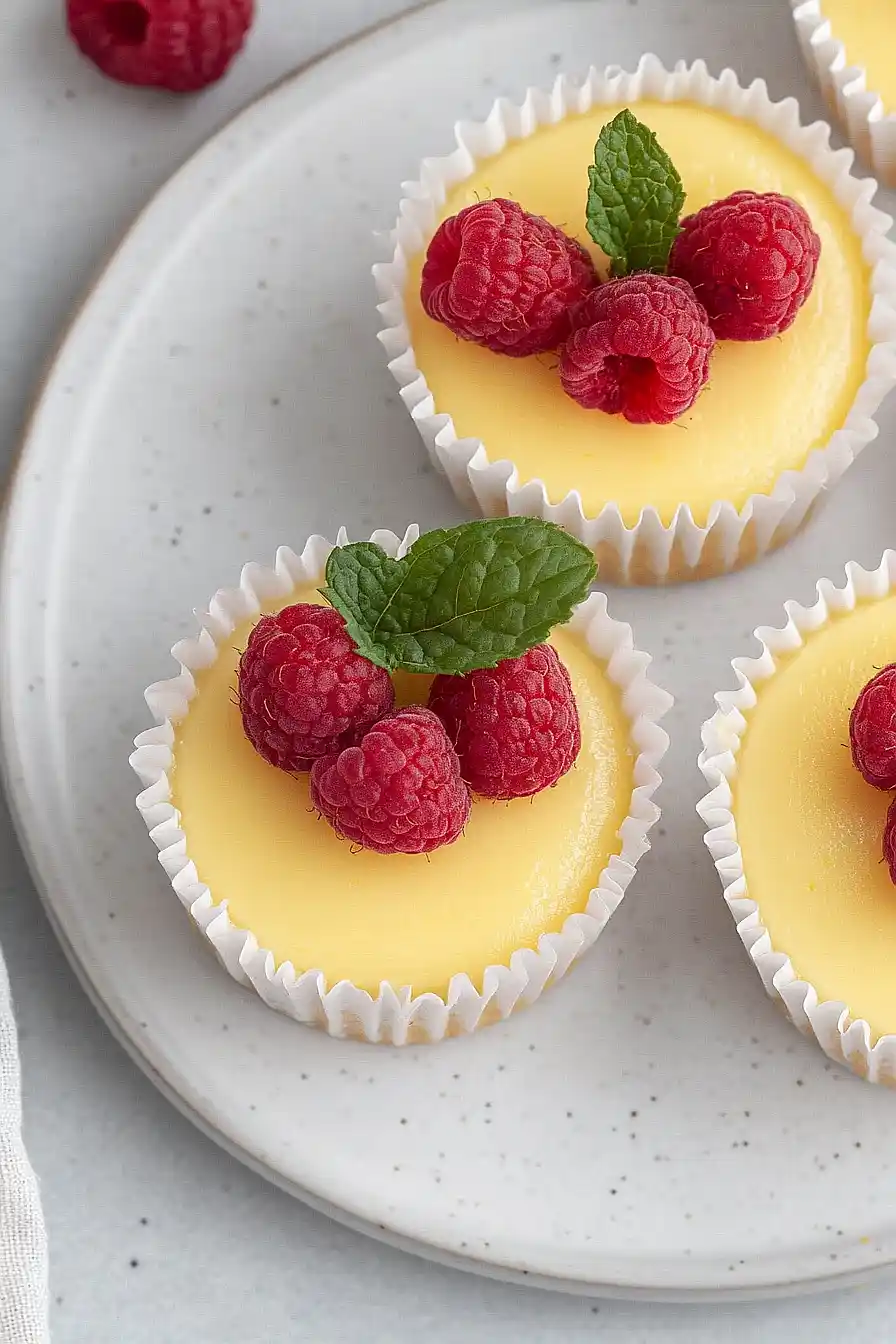
Why You’ll Love These Lemon Cheesecake Mini Cups
- Perfect portion control – These individual mini cups give you just the right amount of dessert without the temptation to cut another slice from a whole cheesecake.
- Bright, refreshing flavor – The combination of fresh lemon zest, lemon juice, and lemon curd creates a light, citrusy taste that’s perfect after a heavy meal.
- Simple ingredients – You probably already have most of these basic ingredients in your kitchen, and the vanilla wafer cookies make an easy crust without any mixing or pressing.
- Make-ahead friendly – These mini cheesecakes need to chill anyway, so you can make them a day ahead for parties or special occasions, making your hosting duties much easier.
- Impressive presentation – Individual desserts always look fancy and thoughtful, even though they’re actually easier to serve than slicing a whole cheesecake.
What Kind of Cream Cheese Should I Use?
For the smoothest, creamiest cheesecake mini cups, stick with full-fat cream cheese – the regular stuff, not the light or reduced-fat versions. Those lower-fat options can make your cheesecake a bit grainy and less rich than you want. Make sure your cream cheese is completely at room temperature before you start mixing, which usually takes about an hour on the counter. If you’re in a hurry, you can cut it into smaller chunks to help it soften faster. Brand-wise, most standard cream cheese brands like Philadelphia work perfectly fine, so don’t feel like you need to splurge on anything fancy.

Options for Substitutions
This recipe is pretty forgiving when it comes to swaps, so here are some options if you need to make changes:
- Cream cheese: Make sure your cream cheese is at room temperature – this is key for smooth mixing. You can use reduced-fat cream cheese, but avoid fat-free as it won’t set properly.
- Vanilla wafer cookies: Graham crackers work great as a substitute – just crush them up. You could also use gingersnaps for a spicier base or shortbread cookies for something buttery.
- Lemon curd: If you can’t find lemon curd, you can make a quick version by whisking together 1/2 cup lemon juice, 1/2 cup sugar, 3 egg yolks, and 4 tablespoons butter over low heat until thick. Berry jam also works if you want a different flavor.
- Fresh lemon: Bottled lemon juice can work in a pinch, but fresh really makes a difference here. If using bottled, you might want to add a bit more to get that bright lemon flavor.
- Granulated sugar: You can use superfine sugar for easier mixing, or reduce to 1/2 cup if you prefer less sweet desserts.
- Fresh raspberries: Any fresh berries work well here – try blueberries, blackberries, or even sliced strawberries for a nice color contrast.
Watch Out for These Mistakes While Baking
The biggest mistake when making mini cheesecakes is using cold cream cheese, which creates lumps that won’t smooth out no matter how much you mix – make sure your cream cheese and eggs are at room temperature for at least an hour before starting.
Another common error is overbaking these little treats, so start checking them at 15 minutes and look for centers that are just barely set with a slight jiggle, as they’ll continue cooking from residual heat even after you remove them from the oven.
Don’t skip the cooling process either – let them cool completely at room temperature before refrigerating for at least 2 hours, otherwise the texture won’t be right and they might crack.
Finally, when adding the lemon curd on top, wait until they’re fully chilled and use a light hand – too much will make them soggy and overpower the creamy cheesecake flavor.

What to Serve With Lemon Cheesecake Mini Cups?
These little lemon cheesecake cups are pretty perfect on their own, but I love serving them with fresh berries like raspberries, blueberries, or strawberries to add a pop of color and freshness. A light dusting of powdered sugar on top makes them look fancy without much effort, and a small dollop of whipped cream never hurts if you want to go all out. They’re great for parties since everyone gets their own individual serving, and they pair nicely with coffee or tea for an afternoon treat. For special occasions, try adding a small mint leaf on top or serving them alongside some shortbread cookies for extra indulgence.
Storage Instructions
Refrigerate: These little cheesecake cups need to stay chilled in the fridge to keep their creamy texture. Store them covered with plastic wrap or in an airtight container for up to 5 days. I like to add the lemon curd and raspberries right before serving to keep everything looking fresh and pretty.
Make Ahead: These mini cups are perfect for making ahead! You can prepare the cheesecake portion up to 2 days in advance and just add the toppings when you’re ready to serve. This makes them great for parties since you can get most of the work done early.
Freeze: Want to prep even further ahead? These freeze really well for up to 1 month without the lemon curd and berries on top. Just thaw them in the fridge for a few hours before serving, then add your toppings. The texture stays nice and creamy after freezing.
| Preparation Time | 20-30 minutes |
| Cooking Time | 22-24 minutes |
| Total Time | 240-300 minutes |
| Level of Difficulty | Medium |
Estimated Nutrition
Estimated nutrition for the whole recipe (without optional ingredients):
- Calories: 2100-2300
- Protein: 25-30 g
- Fat: 150-160 g
- Carbohydrates: 200-220 g
We'll Pay You $5 to Try This Recipe!
Cook our recipe, snap some photos, and earn a $5 Amazon Gift Card. It's that simple!
Here's how:
- Make the recipe
- Take nice pictures of your final dish
- Fill out our quick form (2 minutes max!)
- Your $5 reward is on the way!
Ingredients
For the base:
- 12 vanilla wafer cookies
For the cheesecake batter:
- 16 oz cream cheese, at room temperature
- 2/3 cup white sugar
- Zest from 1 large lemon
- 2 large eggs, room temperature
- 2 tsp pure vanilla extract
- 1 tbsp fresh lemon juice
For serving:
- 1 cup lemon curd (store-bought or homemade)
- Fresh raspberries, optional
Step 1: Prepare the Muffin Pan and Oven
Preheat your oven to 325°F (163°C).
Line 12 muffin cups with paper baking liners.
This helps prevent the cheesecakes from sticking and makes for easy removal later.
Step 2: Beat the Cream Cheese
- 16 oz cream cheese, at room temperature
In the bowl of a stand mixer fitted with the paddle attachment, or in a large bowl using an electric mixer, beat the cream cheese on medium speed for about two minutes until smooth and creamy.
Step 3: Mix Sugar, Lemon Zest and Combine with Cream Cheese
- 2/3 cup white sugar
- zest from 1 large lemon
- 2 large eggs, room temperature
- 2 tsp pure vanilla extract
- 1 tbsp fresh lemon juice
In a medium bowl, combine the white sugar and lemon zest.
Use your fingertips to mix them together until the sugar is moist and fragrant.
Add this lemon sugar mixture to the creamed cheese and beat until the mixture is light and fluffy.
Then, add the eggs, vanilla extract, and fresh lemon juice.
Mix until everything is smooth and well combined.
I always make sure to scrape down the sides of the bowl a few times to avoid lumps.
Step 4: Assemble Cheesecakes in Muffin Cups
- 12 vanilla wafer cookies
- cheesecake batter from Step 3
Place one vanilla wafer cookie, flat side down, in the bottom of each lined muffin cup.
Spoon the cheesecake batter from Step 3 into each cup, filling them about two-thirds full.
Step 5: Bake and Cool the Mini Cheesecakes
Bake the filled muffin cups in the preheated oven for 22 to 24 minutes, or until the centers are almost set.
Remove the pan from the oven and cool the cheesecakes in the pan on a wire rack.
The centers will sink a bit as they cool, creating a perfect spot for your toppings.
Once cooled, refrigerate the cheesecakes for at least 4 hours or overnight for the best texture.
I like to let them chill overnight so the flavor fully develops.
Step 6: Garnish and Serve
- 1 cup lemon curd (store-bought or homemade)
- fresh raspberries, optional
Just before serving, top each cheesecake with a generous spoonful of lemon curd.
Garnish with fresh raspberries if you like, or substitute your favorite topping such as homemade berry sauce or strawberry pie filling for variety.
