I used to think meal prep meant spending my entire Sunday in the kitchen making boring, bland food I’d force myself to eat all week. Turns out, I was doing it wrong.
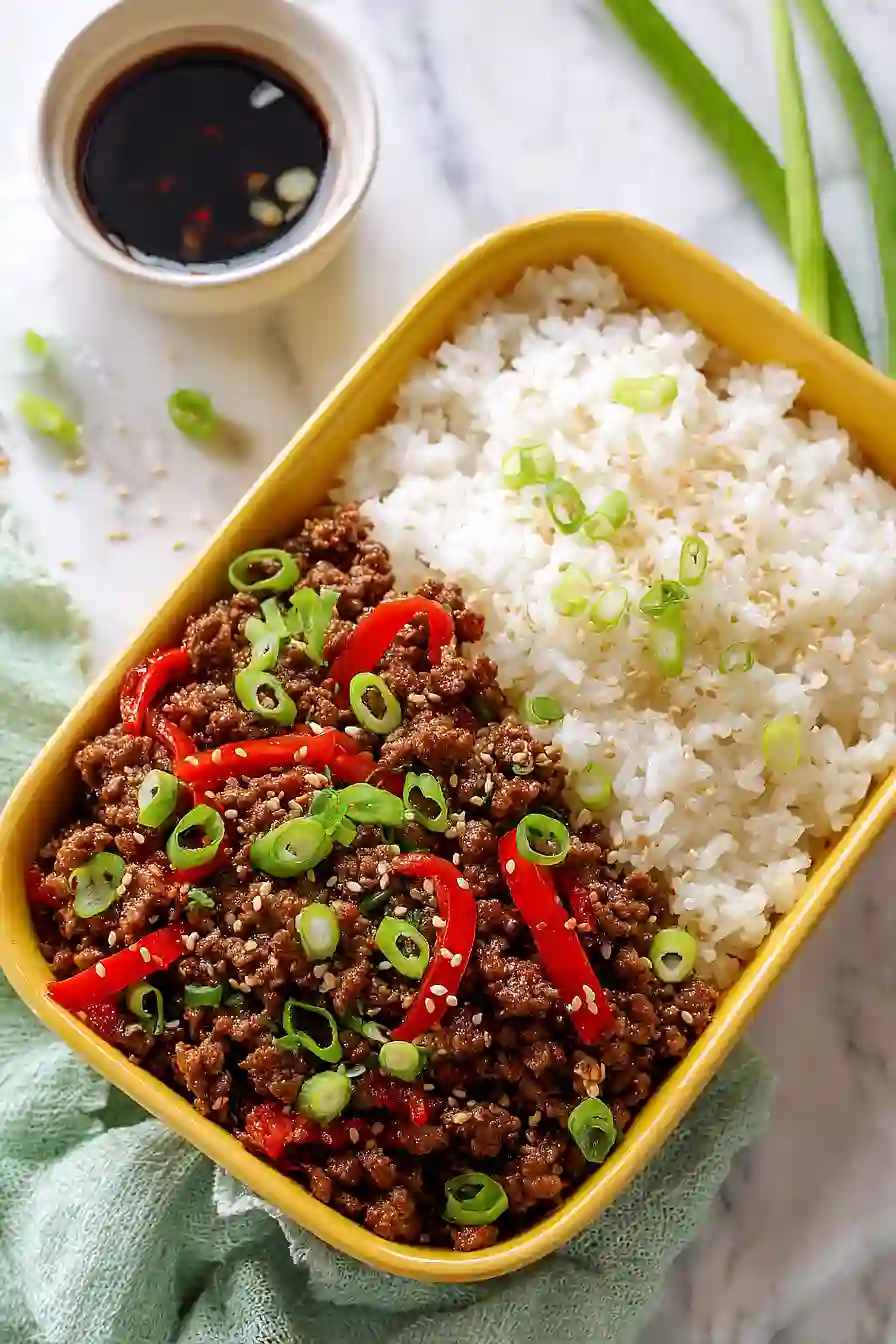
The trick is finding recipes that taste good on day one AND day four. This ground beef and rice bowl checks that box—though we’re swapping regular rice for cauliflower rice to keep things lighter. The coconut aminos and ginger give it that Asian-inspired flavor that honestly makes leftovers something to look forward to.
Best part? The whole thing comes together in one pan in about 30 minutes. No fancy techniques required. Just brown the beef, toss in your veggies and seasonings, and you’ve got five lunches ready to go.
Why You’ll Love This Ground Beef and Rice Meal Prep
- Perfect for meal prep – Make this once and you’ve got healthy lunches or dinners ready to go for the entire week, saving you time and stress on busy days.
- Low-carb and keto-friendly – Using riced cauliflower instead of regular rice keeps this dish light and fits perfectly into your low-carb lifestyle without sacrificing flavor.
- Quick and easy – This entire meal comes together in under 45 minutes, making it ideal for those nights when you need dinner fast but still want something nutritious.
- High-protein – With 2 pounds of ground beef, this recipe packs plenty of protein to keep you full and satisfied throughout the day.
- Asian-inspired flavors – The combination of coconut aminos, sesame oil, ginger, and garlic creates a delicious savory taste that makes healthy eating actually enjoyable.
What Kind of Ground Beef Should I Use?
For this meal prep recipe, you’ll want to pick a ground beef with the right fat content to keep things flavorful without being too greasy. I’d recommend going with 85/15 or 90/10 ground beef – this gives you enough fat for taste and moisture, but won’t leave you with a pool of grease in your meal prep containers. If you only have access to leaner ground beef like 93/7, that’ll work too, though you might want to add a tiny bit of extra sesame oil to keep things from drying out. On the flip side, if you use something fattier like 80/20, just be sure to drain off some of the excess fat after browning so your meal prep stays fresh throughout the week.
Options for Substitutions
This recipe is pretty forgiving when it comes to swaps, so here are some options that’ll work great:
- Coconut aminos: If you don’t have coconut aminos, soy sauce or tamari work perfectly. Use the same amount, but you might want to cut back on the added salt since soy sauce is saltier than coconut aminos.
- Ground beef: Ground turkey, chicken, or pork are all solid substitutes here. You can even use plant-based ground meat if that’s your thing. Just keep in mind leaner meats might need a bit more oil during cooking.
- Fish sauce: Don’t worry if you don’t have fish sauce – you can skip it entirely or add an extra splash of coconut aminos or soy sauce for that savory kick.
- Riced cauliflower: Regular white or brown rice works great if you’re not going low-carb. You’ll need to cook the rice separately according to package directions before mixing it in.
- Fresh ginger and garlic: In a pinch, use 1 teaspoon of ground ginger and 1 teaspoon of garlic powder instead of fresh. Just add them with the other spices.
- Vegetables: Feel free to swap the bell pepper and carrots with whatever you have on hand – broccoli, snap peas, zucchini, or mushrooms all work nicely in this dish.
Watch Out for These Mistakes While Cooking
The biggest mistake people make with ground beef meal prep is not draining the fat properly after browning, which can leave your dish greasy and make the sauce watery – take an extra minute to thoroughly drain or blot the beef with paper towels.
Another common error is adding the garlic and ginger at the same time as the beef, but these aromatics burn easily and turn bitter, so wait until after you’ve drained the fat to add them for just 30 seconds.
If you’re using riced cauliflower instead of regular rice, add it at the very end and cook it separately or just warm it through, since overcooking cauliflower rice makes it mushy and releases excess moisture that waters down your sauce.
Finally, let the beef mixture cool completely before portioning it into containers – putting hot food directly into sealed containers creates condensation that can make everything soggy by day three or four.

What to Serve With Ground Beef and Rice?
This ground beef and rice bowl is pretty filling on its own, but I love adding some quick pickled cucumbers or a simple cucumber salad on the side for a refreshing crunch. You can also serve it with some steamed edamame or snap peas if you want extra veggies, or add a fried egg on top for more protein and richness. If you’re meal prepping for the week, consider packing some sriracha mayo or extra coconut aminos on the side so you can adjust the flavor throughout the week. For a heartier meal, some crispy wonton strips or chow mein noodles sprinkled on top add a nice texture contrast to the tender beef and cauliflower rice.
Storage Instructions
Store: This ground beef and rice meal prep is perfect for the week ahead. Divide it into individual containers and keep them in the fridge for up to 4 days. The flavors actually get better as they sit together, so it’s a great option for Sunday meal prep.
Freeze: You can easily freeze portions of this for later. Let it cool completely, then pack it into freezer-safe containers or bags for up to 3 months. I like to freeze mine in single servings so I can grab just what I need for a quick lunch or dinner.
Reheat: Warm it up in the microwave for 2-3 minutes, stirring halfway through, or heat it in a skillet over medium heat until warmed through. If it seems a bit dry after reheating, just add a splash of water or extra coconut aminos to bring back the moisture.
| Preparation Time | 10-15 minutes |
| Cooking Time | 20-30 minutes |
| Total Time | 30-45 minutes |
| Level of Difficulty | Easy |
| Servings | 4 servings |
Estimated Nutrition
Estimated nutrition for the whole recipe (without optional ingredients):
- Calories: 1700-1900
- Protein: 120-130 g
- Fat: 110-120 g
- Carbohydrates: 60-70 g
Ingredients
For the sauce:
- 3/4 cup coconut aminos
- 1 tbsp sesame oil
- 1 tsp onion powder
- 1 tsp red pepper flakes
- 1 tsp fish sauce
- 1/4 tsp black pepper
For the beef mixture:
- 2 lb ground beef
- 1 tsp salt
- 3 garlic cloves (minced for best flavor)
- 3 tbsp ginger (freshly grated for a pungent kick)
- 1 large red bell pepper (diced into 1/2-inch pieces)
- 3 carrots (shredded or finely diced)
- 5 cups riced cauliflower (I use Green Giant frozen riced cauliflower)
Step 1: Prepare the Sauce and Aromatics
- 3/4 cup coconut aminos
- 1 tbsp sesame oil
- 1 tsp onion powder
- 1 tsp red pepper flakes
- 1 tsp fish sauce
- 1/4 tsp black pepper
- 3 garlic cloves, minced
- 3 tbsp ginger, freshly grated
In a small bowl, whisk together the coconut aminos, sesame oil, onion powder, red pepper flakes, fish sauce, and black pepper.
Set the sauce aside.
Mince the garlic cloves and grate the fresh ginger—I always grate ginger on a microplane rather than mincing it because it releases more of those aromatic oils and distributes better throughout the dish.
Step 2: Brown the Ground Beef
- 2 lb ground beef
- 1 tsp salt
Heat a large skillet over medium-high heat and add the ground beef with 1 tsp salt.
Break the beef into smaller pieces as it cooks, stirring occasionally, until it’s fully cooked and no longer pink, about 6 minutes.
This step is crucial for developing flavor through browning.
Step 3: Drain Fat and Bloom the Aromatics
- 3 garlic cloves, minced
- 3 tbsp ginger, freshly grated
Carefully drain excess fat from the cooked beef using a slotted spoon or by tilting the skillet and pressing the meat against the side.
Return the skillet to medium-high heat, add the minced garlic and grated ginger from Step 1, and cook for about 30 seconds, stirring constantly until fragrant.
This blooming technique extracts maximum flavor from the aromatics.
Step 4: Build the Final Mixture with Vegetables and Sauce
- 1 large red bell pepper, diced into 1/2-inch pieces
- 3 carrots, shredded or finely diced
- sauce mixture from Step 1
Add the diced red bell pepper and shredded carrots to the skillet along with the sauce mixture from Step 1.
Stir well to combine and cook for 6-8 minutes until the vegetables are tender but still have a slight bite.
I like to taste the mixture at the end and adjust seasoning if needed—sometimes the vegetables release moisture and dilute the flavors slightly.
Step 5: Assemble and Store the Meal Prep Containers
- 5 cups riced cauliflower
- beef and vegetable mixture from Step 4
Divide the riced cauliflower evenly among your meal prep containers, creating a base for each serving.
Top each container with an equal portion of the beef and vegetable mixture from Step 4.
Let the containers cool to room temperature before sealing and refrigerating for the week.
Dairy-Free Ground Beef and Rice Meal Prep
Ingredients
For the sauce::
- 3/4 cup coconut aminos
- 1 tbsp sesame oil
- 1 tsp onion powder
- 1 tsp red pepper flakes
- 1 tsp fish sauce
- 1/4 tsp black pepper
For the beef mixture::
- 2 lb ground beef
- 1 tsp salt
- 3 garlic cloves (minced for best flavor)
- 3 tbsp ginger (freshly grated for a pungent kick)
- 1 large red bell pepper (diced into 1/2-inch pieces)
- 3 carrots (shredded or finely diced)
- 5 cups riced cauliflower (I use Green Giant frozen riced cauliflower)
Instructions
- In a small bowl, whisk together the coconut aminos, sesame oil, onion powder, red pepper flakes, fish sauce, and black pepper. Set the sauce aside. Mince the garlic cloves and grate the fresh ginger—I always grate ginger on a microplane rather than mincing it because it releases more of those aromatic oils and distributes better throughout the dish.
- Heat a large skillet over medium-high heat and add the ground beef with 1 tsp salt. Break the beef into smaller pieces as it cooks, stirring occasionally, until it's fully cooked and no longer pink, about 6 minutes. This step is crucial for developing flavor through browning.
- Carefully drain excess fat from the cooked beef using a slotted spoon or by tilting the skillet and pressing the meat against the side. Return the skillet to medium-high heat, add the minced garlic and grated ginger from Step 1, and cook for about 30 seconds, stirring constantly until fragrant. This blooming technique extracts maximum flavor from the aromatics.
- Add the diced red bell pepper and shredded carrots to the skillet along with the sauce mixture from Step 1. Stir well to combine and cook for 6-8 minutes until the vegetables are tender but still have a slight bite. I like to taste the mixture at the end and adjust seasoning if needed—sometimes the vegetables release moisture and dilute the flavors slightly.
- Divide the riced cauliflower evenly among your meal prep containers, creating a base for each serving. Top each container with an equal portion of the beef and vegetable mixture from Step 4. Let the containers cool to room temperature before sealing and refrigerating for the week.
