If you ask me, caramelized onions make everything better.
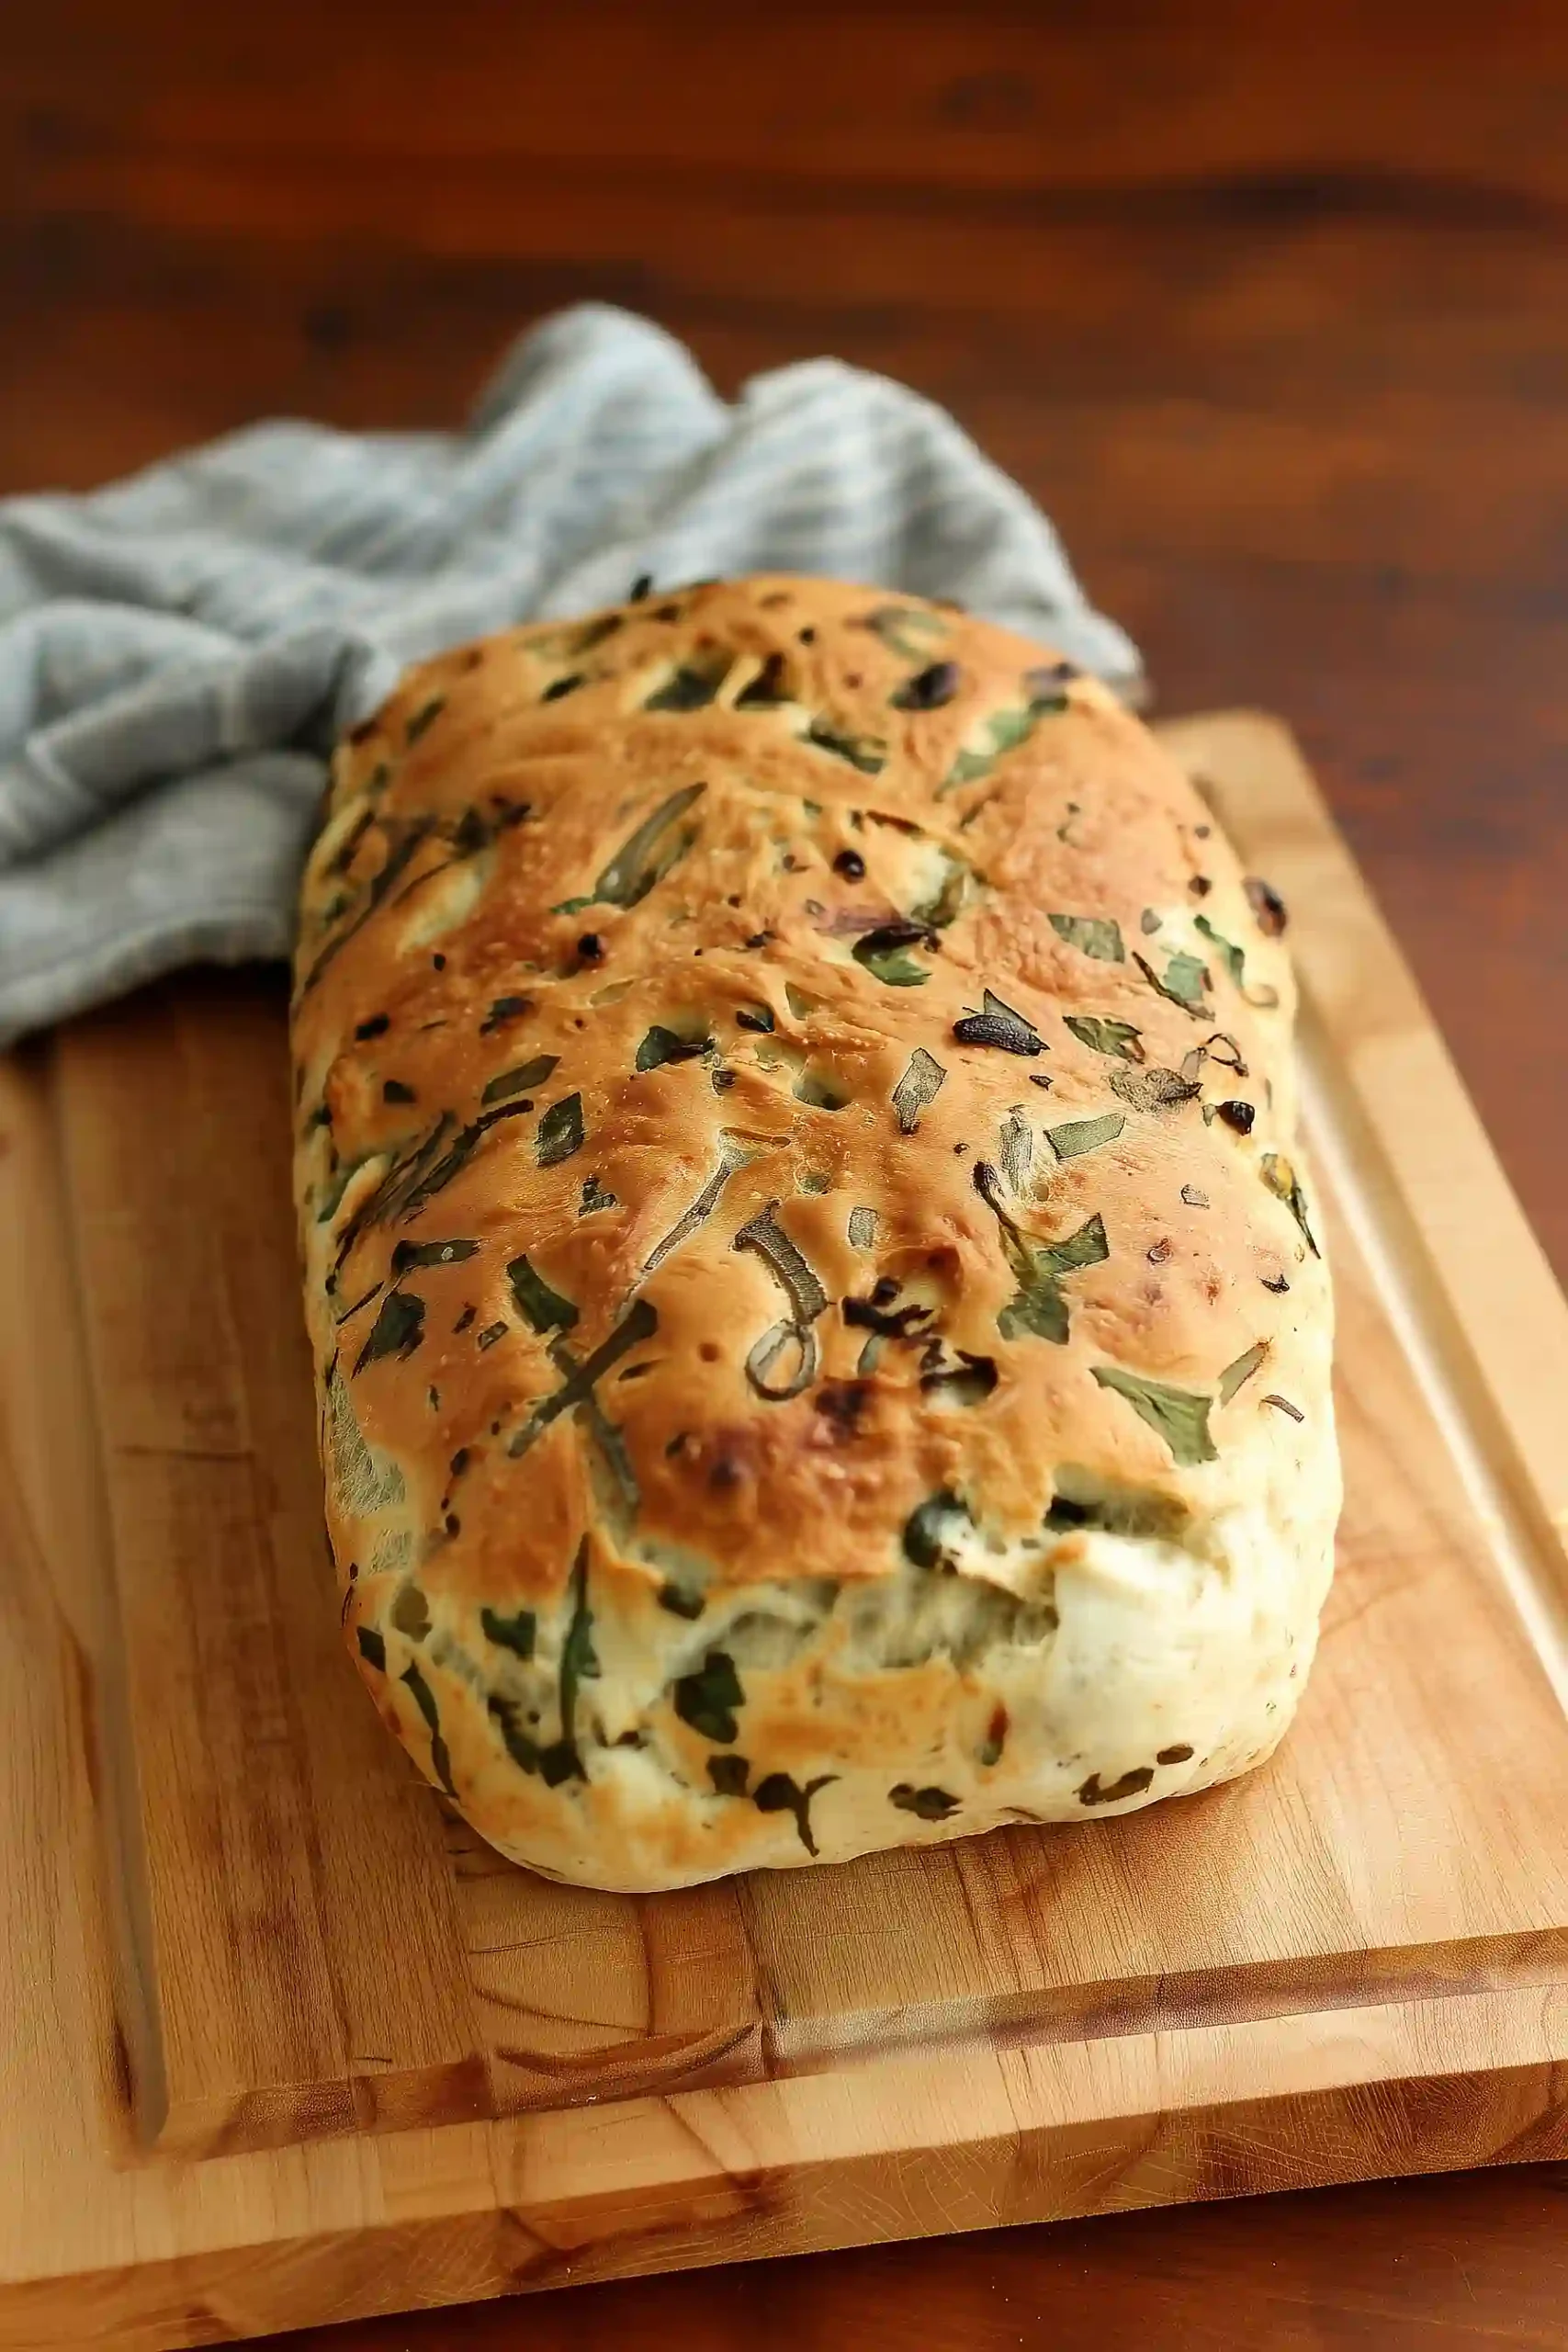
This homemade bread combines sweet, golden onions with a soft, chewy loaf that’s perfect for any meal. The onions get cooked low and slow until they turn deep brown and develop that rich, sweet flavor we all love.
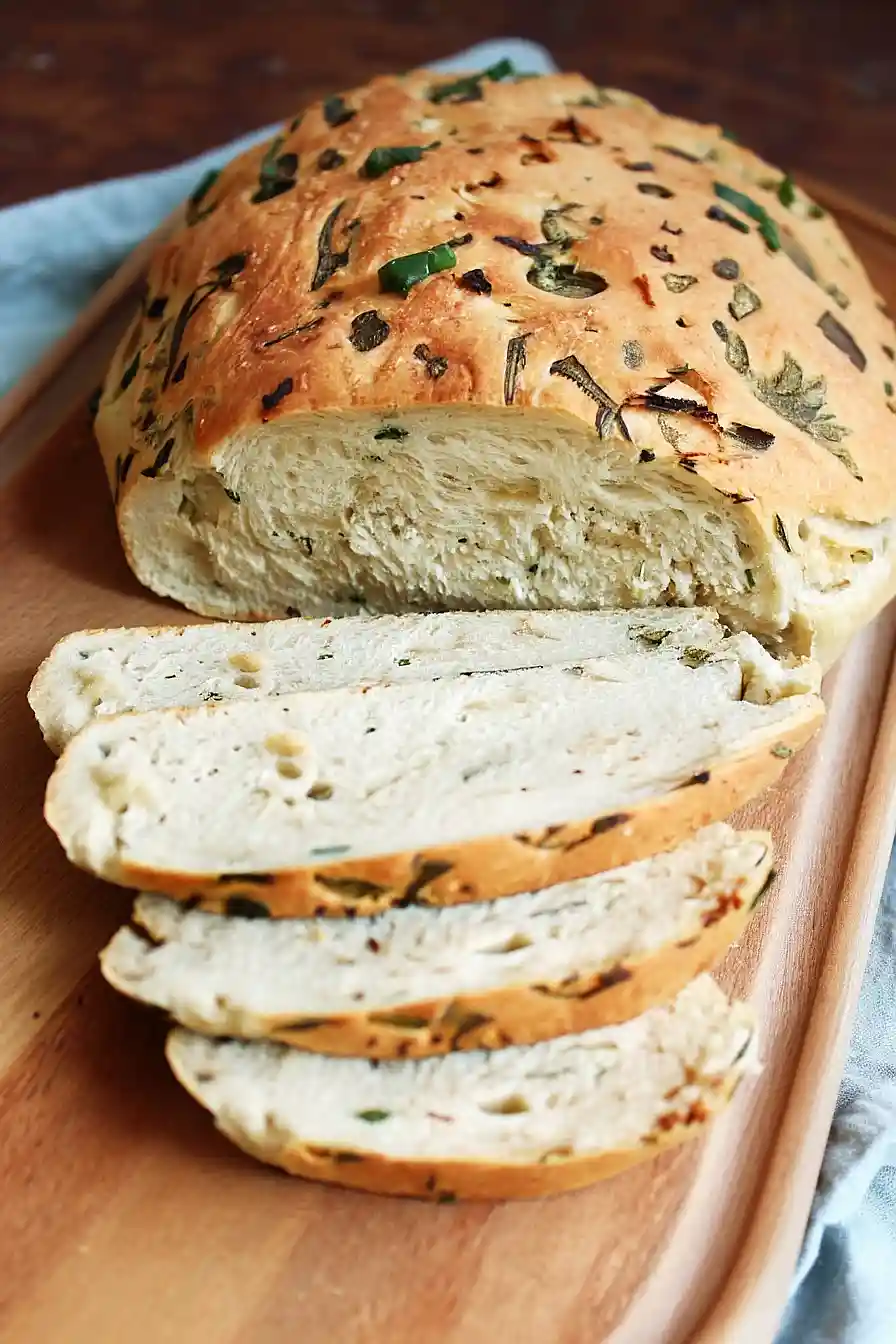
The bread itself has a nice crust on the outside and stays tender on the inside. Those caramelized onions get folded right into the dough, so every bite has pockets of sweetness.
It’s the kind of bread that makes your kitchen smell amazing while it bakes, and it pairs well with soups, salads, or just eaten warm with butter.
Why You’ll Love This Caramelized Onions Bread
- Rich, savory flavor – The caramelized onions add a deep, sweet taste that makes this bread way more interesting than regular homemade bread.
- Simple ingredients – You probably have most of these basics in your kitchen already – just flour, yeast, onions, and a few other pantry staples.
- Quick for homemade bread – At just over an hour from start to finish, this bread comes together much faster than traditional bread recipes that need hours of rising time.
- Perfect for any meal – This bread works great as a side dish, for making sandwiches, or just eating warm with some butter.
- Fresh green onion boost – The chopped green onion leaves add a nice fresh bite that balances out the sweet caramelized onions perfectly.
What Kind of Onions Should I Use?
For this caramelized onion bread, you’ll want to use yellow or sweet onions for the best results. Yellow onions are perfect because they have just the right balance of sweetness and sharpness, and they caramelize beautifully when cooked low and slow. Sweet onions like Vidalia or Walla Walla are also great choices if you prefer a milder, sweeter flavor in your bread. Red onions can work too, but they’ll give you a slightly sharper taste and might turn your bread a bit purple. When selecting your onions, look for ones that feel firm and heavy for their size, with dry, papery skins and no soft spots or sprouting.

Options for Substitutions
This bread recipe is pretty forgiving when it comes to making swaps:
- Fresh yeast: If you can’t find fresh yeast, active dry yeast works perfectly – the recipe already includes the conversion. You can also use instant yeast (use the same amount as active dry) but skip the proofing step and mix it directly with the flour.
- All-purpose flour: Bread flour will give you a chewier texture if you prefer that, or you can substitute up to half the flour with whole wheat flour for a nuttier flavor. Just add a bit more water if the dough seems too dry.
- Green onion bulbs and leaves: Regular yellow or white onions work fine if you can’t find green onions with bulbs. Use about 1 medium onion total and caramelize it along with your large onion. For the green parts, chives or regular scallion tops are great substitutes.
- Olive oil: Any neutral oil like vegetable or canola oil works for caramelizing the onions. Butter adds extra flavor but watch it carefully so it doesn’t burn.
- Large onion: Yellow, white, or sweet onions all caramelize beautifully. Sweet onions like Vidalia will give you a milder, sweeter flavor, while yellow onions provide more depth.
Watch Out for These Mistakes While Baking
The biggest mistake when making caramelized onion bread is rushing the onion caramelization process – true caramelized onions take at least 30-45 minutes of slow cooking over medium-low heat, and trying to speed this up with high heat will give you burnt, bitter onions instead of sweet, golden ones.
Another common error is adding the caramelized onions while they’re still hot, which can kill your yeast and prevent proper rising, so always let them cool completely before mixing into your dough.
Don’t forget to drain any excess oil from your caramelized onions before adding them to the bread, as too much moisture can make your dough sticky and affect the final texture.
Finally, when kneading, be gentle with the dough once you add the onions to avoid breaking them up too much – you want nice pieces throughout your bread, not onion mush.
What to Serve With Caramelized Onion Bread?
This savory bread is perfect alongside a warm bowl of soup – think creamy mushroom, roasted vegetable, or even a simple chicken broth. The sweet caramelized onions in the bread pair beautifully with a cheese and charcuterie board, where you can add some soft cheeses like brie or goat cheese that complement the onion flavors. I love serving thick slices with a hearty stew or braised meat dishes since the bread soaks up all those good juices. For a lighter option, try it with a fresh salad dressed in olive oil and herbs, or simply toast a slice and top it with scrambled eggs for a satisfying breakfast.
Storage Instructions
Keep Fresh: This caramelized onion bread tastes amazing fresh, but it’ll stay good wrapped in a clean kitchen towel or stored in a bread box for about 3-4 days. The onions keep the bread nice and moist, so you don’t have to worry about it drying out too quickly.
Freeze: I love slicing this bread and freezing individual pieces wrapped in plastic wrap, then putting them all in a freezer bag. They’ll keep for up to 3 months and you can just grab a slice whenever you want some. You can also freeze the whole loaf wrapped tightly in plastic wrap and foil.
Toast: Day-old caramelized onion bread makes incredible toast! Just pop frozen slices straight into the toaster, or if you have a whole loaf, let it thaw at room temperature for a few hours first. The caramelized onions get even more flavorful when toasted, making it perfect for sandwiches or just with a little butter.
| Preparation Time | 30-45 minutes |
| Cooking Time | 25-30 minutes |
| Total Time | 55-75 minutes |
| Level of Difficulty | Medium |
Estimated Nutrition
Estimated nutrition for the whole recipe (without optional ingredients):
- Calories: 1600-1800
- Protein: 40-50 g
- Fat: 40-50 g
- Carbohydrates: 250-270 g
We'll Pay You $5 to Try This Recipe!
Cook our recipe, snap some photos, and earn a $5 Amazon Gift Card. It's that simple!
Here's how:
- Make the recipe
- Take nice pictures of your final dish
- Fill out our quick form (2 minutes max!)
- Your $5 reward is on the way!
Ingredients
For the caramelized onion:
- 1 large onion, chopped or thinly sliced
- 2 tbsp olive oil
- Salt, to taste
For the dough:
- 4 cups flour (about 17.5 oz)
- 1 tsp salt
- 25 g fresh yeast or 2 1/4 tsp active dry yeast
- 1 1/3 cup warm water
- 1 bunch green onion leaves, finely chopped
- Caramelized onion
For assembling:
- 1 bunch green onion bulbs, chopped
- Optional: extra salt and more chopped green onion leaves for topping
Step 1: Caramelize the Onions
- 1 large onion, chopped or thinly sliced
- 2 tbsp olive oil
- salt, to taste
Heat olive oil in a frying pan over medium heat.
Add the chopped or thinly sliced onion and cook, stirring occasionally, until the onion is soft and golden brown.
Season with salt to taste and set the caramelized onion aside to cool completely before adding to the dough.
Step 2: Prepare the Dough
- 4 cups flour (about 17.5 oz)
- 1 bunch green onion leaves, finely chopped
- 25 g fresh yeast or 2 1/4 tsp active dry yeast
- 1 tsp salt
- 1 1/3 cup warm water
- caramelized onion from Step 1
In a large bowl, mix together the flour and the finely chopped green onion leaves.
Dissolve the fresh yeast with 1 tsp salt and 1/3 cup warm water, then add this mixture to the flour mixture.
Pour in the remaining 1 cup warm water and mix well.
Once combined, add the caramelized onion from Step 1 and knead the mixture until a smooth dough forms and it pulls away from the sides of the bowl.
Cover the bowl with a kitchen towel and let the dough rise at room temperature for about 1 hour, or until doubled in size.
I always find that letting the dough rise in a slightly warm spot makes the process faster and gives a fluffier loaf.
Step 3: Shape and Second Rise
- dough from Step 2
- optional: extra salt and more chopped green onion leaves for topping
Turn the risen dough out onto a floured surface and gently shape it into a loaf.
Place the loaf into a 6×10 inch (15×25 cm) baking tray or a regular loaf pan.
Allow it to rise again for about 30 minutes until slightly puffy.
If desired, sprinkle extra salt and more finely chopped green onion leaves on top for added flavor and an attractive finish.
Step 4: Bake the Bread
- shaped loaf from Step 3
Preheat your oven to 470°F (240°C).
Place a small pot with water at the base of the oven to create steam.
Bake the loaf for 15 minutes with the steam, then carefully remove the pot of water from the oven.
I find this steam step gives the bread a crispier crust, which I always love!
Step 5: Finish Baking and Cool
Reduce the oven temperature to 450°F (230°C) and continue to bake the bread for another 10-15 minutes, or until deep golden brown and cooked through.
Remove the bread from the oven, transfer to a wire rack, and let it cool completely before slicing.
Waiting for the bread to cool ensures the crumb sets nicely and makes for cleaner slices.
